


Even if you don't grow weed, we're sure you've heard hydroponics come up in conversation. This term actually refers to a growing system used for many crops, including, but not limited to, cannabis. We'll show you how to grow weed hydroponically, and detail the benefits and drawbacks of each system.
Contents:
- What Is Hydroponic Weed?
- The Origins of Hydroponic Growing
- Why Choose Hydroponics for Growing Cannabis?
- Choosing a Growing Medium for Hydroponic Weed
- Hydroponic Grow Guide: Step by Step
- Best Nutrients for Hydroponic Cannabis
- Should I Use Hydroponics for Indoor or Outdoor Growing?
- Is It Possible To Grow Weed Organically With Hydroponics?
- Best Strains To Grow Hydroponically
- Growing Weed the Hydroponic Way: Which System Will You Choose?
People have been growing their cannabis plants in rich soil for centuries, but a large share of modern gardeners and farmers alike have switched to hydroponic systems. Whether they’re growing fruits and vegetables or tasty weed buds, many find hydroponically grown plants to perform better than their soil-raised counterparts.
There are many ways to go about conducting a hydroponic grow, and you need to keep various factors of each process in mind to pull one off successfully. So, for this article, we’ll be going through each possible approach to hydroponics, including different potential media, watering methods, and nutrition systems. To cap things off, we’ll also suggest some of the best strains to grow in your new setup.
What Is Hydroponic Weed?
You probably have an idea of this based on the introduction, but we might as well get a clear definition out of the way.
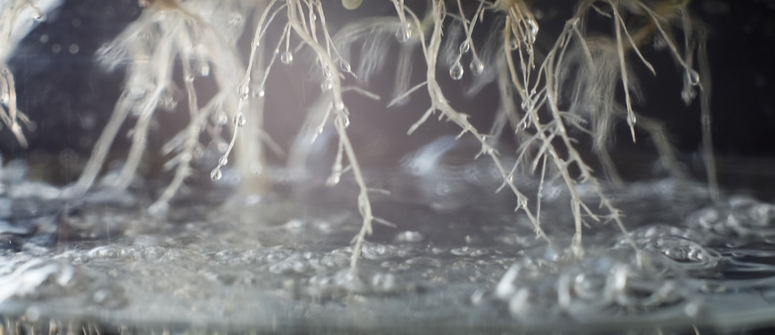
Essentially, hydroponic weed is any cannabis plant you grow without the use of soil, with the roots (usually) suspended in another medium and fed with a nutrient solution. It can look different to varying degrees depending on what method you employ, but we’ll cover that in more detail later.
The Origins of Hydroponic Growing

It may surprise you to learn that growing hydroponically is a practice that dates back thousands of years.
It is theorised, though not agreed upon, that the hanging gardens of Babylon employed hydroponic systems over 2,500 years ago. As the region in which they were grown was highly arid, it is suspected that the river Euphrates was used to feed a trickle system, which ran down, feeding the roots of all the plants.
Later, on lake Tenochtitlan, the Aztecs are said to have grown crops upon floating rafts. A top layer of soil would hold the plants, and their roots would grow through the raft into the lake below.
In 1699, John Woodward found that spearmint grew more quickly in a water source mixed with soil.
Why Choose Hydroponics for Growing Cannabis?
But why would someone choose to grow their weed this way? What do hydroponic systems offer that a standard plot of soil can’t? As it turns out, they have some key advantages over standard soil, but can present some unique problems as well.
Advantages of Growing Marijuana Using Hydroponics
One of the main reasons, as many hydroponic growers will tell you, is the control over nutrition these methods grant you. Certain cannabis plants you raise may require slightly different nutrient balances as they grow, and you may not be able to accommodate those if you’re growing in soil.
In a hydroponic system, however, you can adjust the nutrient balance in your aqueous (water-based) solution with little effort, and your plants will be back on their ideal growth track.
This advantage also applies when considering the pH, as you’ll be able to determine it far more accurately than otherwise. By rapidly applying any adjustments, you can ensure the life cycle of your plants is marked with almost no interruption.
Speaking of no interruption, the lack of soil means you don’t have to deal with a wide variety of pests that would otherwise be in the way, ensuring your plants enjoy a smooth path to harvest.
Without that soil in the way, your roots will also have much easier access to nutrients, meaning nearly every bit of them is used, and anything that isn’t absorbed at one point can be utilised later on.
The growing process is also far less messy, since dirt can get into the smallest of crannies and stain your clothes, while the alternative media we’ll discuss later are far easier to handle.
You can also rethink how you’d like to use your space, as hydroponic growing allows you to situate your plants far closer to one another. Provided you’re able to afford taking care of more plants, this allows for a far more efficient system.
With all of these factors in place, your plant will not only be able to grow faster, but healthier as well. It’ll get larger in turn, and end up offering a much higher yield than it would if grown in soil.
Benefits at a glance:
• More control over nutrition and pH
• Potentially shorter life cycle (no wasted time)
• Lower risk of pests
• Better use of space
• Less messy
• Potential for greater yields
Disadvantages of Growing Marijuana Using Hydroponics
Those advantages, of course, only really apply if you’re taking excellent care of your plants. We’re sure you will, but it’s worth noting that slip-ups during the process can impact hydroponic cannabis far more dramatically than its soil-raised peers.
Since the nutrient intake is so direct, a poor balance will have a near-immediate effect on your crops. As issues hit so rapidly, they’re also especially hard to reverse, and are therefore more likely to lead to a plant’s death.
You’ll also have to be very considerate of your power supply, meaning you’ll need an immediate plan set in case of a power outage. Since your plants will receive water via an electric pump system, as we’ll explain later, a loss of electricity means your plants lose all access to water. In that situation, they could die within a few hours unless you employ a backup method.
Maintaining the right temperature will also be more important than usual, with temperatures between 20–25ºC being ideal. You can go up to 28ºC before issues arise, but your plant will get stressed from that point on, eventually dying if it gets up to 35ºC in the grow space.
Rather than passing due to physical harm, though, your plant would die at that temperature because its root system wouldn't be able to process oxygen in the water.
Even if you’re able to handle all that, you should also consider the investments you’ll have to make for your hydroponic setup to thrive. These sort of growing systems can cost hundreds or thousands of dollars depending on the size of your space, and maintenance costs will stack up over time as well.
You’ll earn your money back in the form of successful harvests, sure, but it’s hard to ignore the bills that come in before harvest day.
Lastly, as you’re putting that money down, you’ll also have to keep in mind the inherent risk of water and powerful electronics occupying the same room. Yes, your electric water pump will likely be waterproof, but you also have to consider your grow lights, or perhaps any ventilation and heating systems in the room.
If any water ends up spilling, some or all of your equipment could end up getting damaged. Worse still, if you don’t have backup lights, or if your whole power system is compromised, you’ll be hard pressed to save your plants.
Drawbacks at a glance:
• Nutrient or pH issues are more serious and harder to fix
• You’re reliant on your power supply and pump system
• Temperature must be kept within certain parameters
• More expensive setup than soil grows
• Safety risk of water and electric
Is Hydroponic Weed Stronger?
With the pros and cons of the process weighed out, many among you are probably wondering whether certain aspects of the bud quality reflect the extra effort taken. In other words, does growing weed in a hydroponic setting make it stronger than otherwise?
Well, in some senses, yes. If you’re able to take proper care of it, of course, and it reaches harvest day with no interruption, your plant should be noticeably larger and, potentially, healthier than if grown in soil. The plant being at its healthiest, then, is a good indicator that its THC content will fall in the upper limit of its possible range.
That being said, hydroponic growing won’t grant your plant a THC level higher than its usual upper limit.
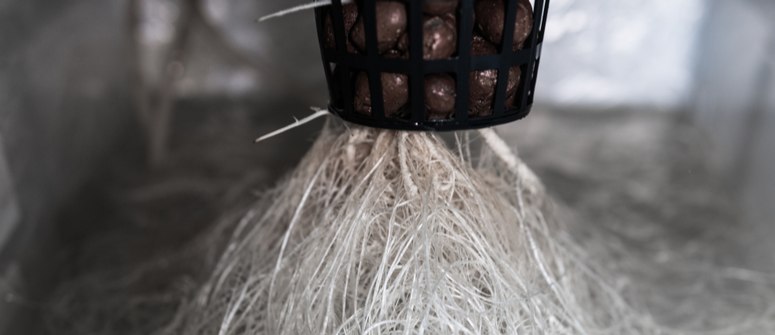
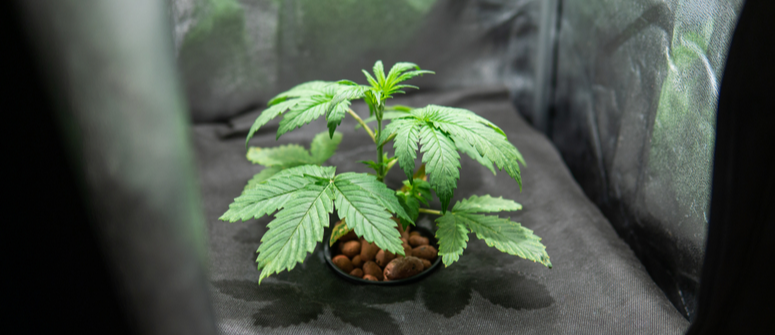
Choosing a Growing Medium for Hydroponic Weed
Even though you aren’t using soil, you’ll still need some sort of medium for your roots to grow into. Your nutrient and water solution will handle the process of delivering nutrients, but your medium of choice will still play a key role in supporting the root system.
Some media are better suited for certain hydroponic systems, which you’ll need to consider for your grow. Below are some of the most popular hydroponic media used by cannabis growers.
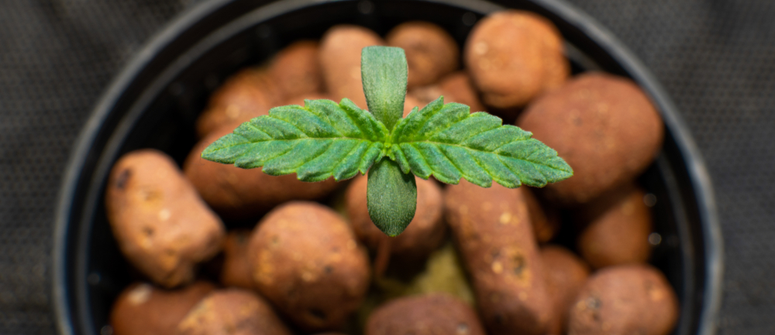
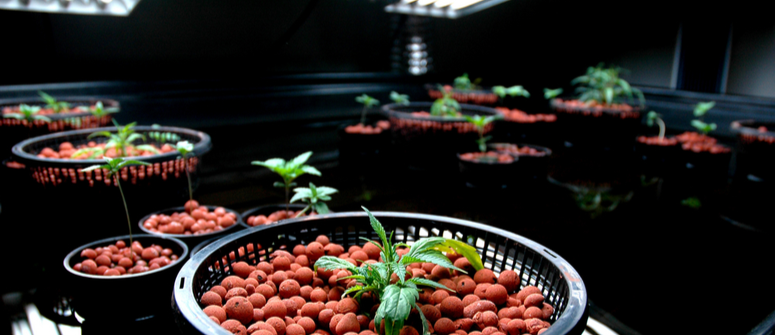
Clay Pebbles
Clay pebbles are shaped in a way that allows pockets of space to remain between them when used as a medium. They’re also big and sturdy enough to support a root system, making them an especially popular choice among hydroponic growers. As long as they’re placed in a hydroponic basket, usually one made of plastic, and aren’t too densely packed, they’ll serve as a very reliable foundation for your plant.
Besides that, just make sure they’re at the ideal pH for cannabis growth, which is around 5.5 to 6.5 in hydro. Clay naturally needs to be altered to fit this requirement, but some pebble packages come already adjusted for the conditions.
Rockwool
Rockwool, as the name explains, is a sort of volcanic rock that is given a texture akin to wool. Thanks to those particular properties, rockwool is excellent at retaining water, which goes a long way in taking good care of your upper root system.
The porous yet solid material also offers excellent support for your plant, fitting well in a hydroponic bucket system, but comfortably working into the top of a tank or bucket as well.
Perlite
Like rockwool, perlite is sourced from volcanic material. However, it’s actually glass, rather than rock, and it’s more celebrated for its ability to provide aeration, while also being decent with water retention and support.
Even soil growers will use it in their operations to give their roots more breathing room, and it’s just as effective, if not more so, when used on its own.
Coco Coir
Lastly, if you want a medium that’s more sustainable and biodegradable, coco coir will be your best option. It’s made from the fibres of coconut shells, and the texture and consistency allow for excellent aeration and water retention.
They also contain some hormones that are known to stimulate cannabis plants, so much so that they’re able to protect your weed from infections that could otherwise stunt or kill them.
Hydroponic Grow Guide: Step by Step
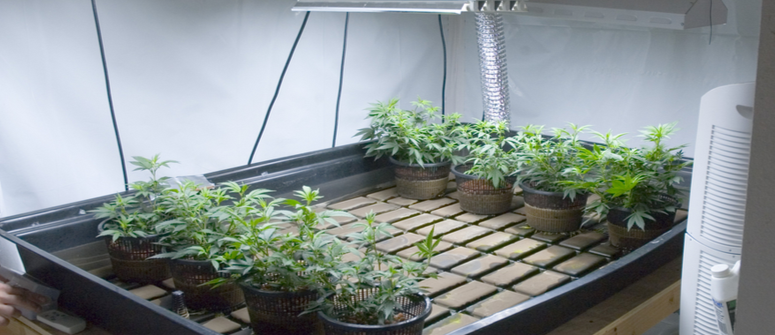
Along with having different options of media, you’ll also have various choices as far as the specific hydroponic growing system you employ. Each has benefits and drawbacks over the other, and we'll explain them all in detail below.
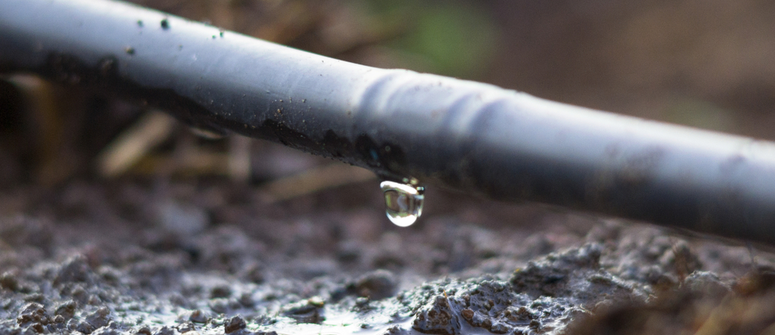
Drip Irrigation System
We’ll start off with one of the most popular systems among hydroponic growers: drip irrigation. As the name suggests, this involves feeding your plants with a nutrient solution from the top down via a periodic drip system.
This, specifically, works via a network of tubes that run from your reservoir to the area over your plants. These tubes then lead to emitters situated below the medium, near the roots of your plants. Then, in intervals throughout the day, they drip solution into the growing medium for your roots to suck up, feeding them at a regular and measured pace.
What You Need
Along with being one of the most popular systems, drip irrigation is also quite easy to set up, only requiring a few different materials. Your shopping list is as follows:
• ½ in / 1.25cm polyethylene tubing (for the main feeding line) with end cap
• ¼ in / 0.635cm polyethylene tubing (for the divergent feeding lines)
• Clamp and pierce connectors (so the divergent lines can connect to the main)
• Large, opaque plastic drum (to serve as the reservoir tank, around 200 litres)
• Submersible water pump that can process at least 1,135 litres per hour
• Digital thermometer (to monitor reservoir temperature)
• Air pump with air stones and tubing (to keep water oxygenated)
• In-line drippers (2–4 per plant to distribute water throughout the pot)
• Terminal drippers (2 per plant at the end of divergent lines to periodically drip water)
• Drill with a 2cm (0.75in) bit (to create necessary holes in the reservoir tank)
• Large tray (to capture excess nutrient solution from the bottoms of your net pots)
• Timer (to make sure the pump operates precisely when needed)
Step-by-Step Guide
Bringing everything together shouldn’t take you much longer than half a day. Also, as we begin this explanation, it’s worth noting your reservoir should sit just outside of your grow tent, rather than inside.
1. To start, drill a hole a couple inches below the lid of your plastic drum. This will allow your main water line to pass through from the inside out.
2. Place your water pump into the drum with the main water line attached, along with an air stone attached to your air pump line, and your digital thermometer’s probe. Then, drill a hole in the lid of your bucket that’s large enough to feed the air pump and thermometer lines through. The air pump and thermometer themselves, of course, will be situated well outside the bucket.
3. Pass the main water line through the top-side hole in the bucket, allowing the main line to slowly descend and plateau at a height slightly above your pots. In that process, you should cut a small hole into your tent so the line can pass through, allowing it to run all the way across the tent and between the plants.
This will lead to even, consistent distribution in the long run. Once you’ve measured and cut down your main line, attach the end cap so pressure can build.
4. Attach your clamp and pierce connectors along the main line, situating them so there are two to supply each of your plants. Ensure you’re pointing these in the proper direction as well.
5. Measure and cut lengths of smaller divergent feeding lines, making sure it’s long enough to curve around the side of the bottom of the plant.
6. Attach it to the first clamp and pierce connector, extend it over the growing medium, and attach it to an in-line dripper. Attach an equal-sized length of divergent line to the other end of the dripper, and connect that end to a staked-in terminal dripper.
7. Repeat this process with the second connector, having the lines, in-line dripper, and terminal dripper go over whatever area of the roots your first set couldn’t reach. If your first line setup goes around the inner root sections, closer to the plant, have the second setup stretch around it, covering the outside section and ensuring full nutrient intake.
8. Repeat this connection process with all of the other plants in your growing space.
9. Customise your large plant tray to allow for nutrient drainage, and situate it under your net pots. Be sure you also have a bucket or other container for the unused solution to drain into. From there, decide whether you want to throw that solution away (which minimises risk) or recycle it so your plants can try using it again (which maximises efficiency).
10. From there, start up your water pump and set it to work at regular intervals with your timer. Then, place it back into the bucket, turn on your thermometer and air pump, close the lid, and let your new drip irrigation system take over!
Pros and Cons of a Drip Irrigation System
Pros:
• Efficient with water and energy
• Somewhat low-maintenance
• Straightforward
• Relatively inexpensive
• Popular (you’ll find plenty on grower forums out there)
Cons:
• Emitters can get clogged over time if your water has a higher iron content than normal
• Regular maintenance checks required
• Pests may chew on your lines
Nutrient Film Technique (NFT)
Perhaps just as popular among hydroponic growers, if not more so, nutrient film technique (NFT) systems are among the most efficient and effective you can assemble. You’ll only have the very tips of the roots touching the nutrients, but they’ll get all the nutrition they need. As long as you work carefully, it can lead to some high-quality harvests.
What You Need
There isn’t one true way to get an NFT system up and running, but nearly every iteration has materials in common:
• Submersible water pump and lines (should be able to pump 946–1,135 litres per hour)
• Air pump, tubes, stone(s) (should be able to pump 7–9 litres of air per minute)
• Large reservoir (200-litre plastic tote will work well)
• Net pots (size depending on your plant of choice)
• Growing medium (consider the mesh in your net pots when picking)
• NFT channel(s) (one or more depending on the amount of plants you’re growing)
• Timer for the water pump (not mandatory, but encouraged)
Step-by-Step Guide
NFT systems can seem complicated at first glance, but you shouldn’t have any real issues if you don’t rush yourself.
1. To begin, you’ll need to set up your reservoir. Start by making holes big enough for your air and water lines, drilling them into the top half of the narrow side of the tote. One hole should be slightly above the halfway mark, while the other should be closer to the lid.
2. Drill another hole in the top; place it on the opposite end of the upper side hole, about 15cm from the edge. Make sure you line it up with your NFT channel’s drain so you know everything will fit together.
3. Situate your air pump outside the reservoir and run your air line through the lower side hole. Then, attach the end of that line into an air stone and leave it in the bottom.
4. Place your water pump in the reservoir adjacent to the air stone, attaching the water line and running it through the upper side hole.
5. If you have one, attach your timer to the water pump and set up its schedule.
6. Fill the reservoir up to the halfway mark with your nutrient solution.
7. Set up an NFT channel on top of the reservoir, and reposition the water line so it can fill the bottom of it. In turn, make sure you have it angled at a slight slope, with the channel’s drain at the bottom end. You also need to make sure the drain aligns with the top hole in your reservoir.
8. Then, drill openings into the NFT channel to fit your net pots. The sizing and spacing of these, of course, will depend on the size of what you’re growing.
Pros and Cons of Nutrient Film Technique (NFT)
Pros:
• Far more efficient in water and nutrients than standard grows
• Customisable: NFT setups can be expanded or scaled back to your liking
• Exposed nature of the system allows for quick inspection and disinfection of roots
• Constant flow and circulation of water/nutrients eliminates groundwater contamination issues and prevents salt buildup around the roots
Cons:
• Not suitable for very large plants
• If your pumps fail, especially your water pump, you only have a few hours to fix it before the entire crop dies
Ebb and Flow System
As you may have inferred from the name, ebb and flow systems rely on shifting water levels to promote optimal growth. They look quite simple, but the system itself and the timing need to be finely tuned to ensure success.
There are two main sections: the reservoir containing the water/nutrient solution, and the large flood tray holding your potted plants situated right above. A pump and drain run between them, allowing you to periodically submerge the roots and cycle the water/nutrients out after.
What You Need
This system operates with a small number of pieces working in a coordinated dance:
• 200-litre plastic tote reservoir tank (opaque to prevent algae issues)
• Flood tray for your plants, with a volume around 75 litres (depending on amount of plants and their size)
• 1.25cm (.5in) opaque tubing for water pump
• Submersible water pump that can cycle 946–1,135 litres per hour
• Overflow and inlet fittings designed for ebb and flow hydroponic systems (should be available at most gardening stores)
• Drill to form 35mm holes for your fittings
• Timer that can coordinate with your water pump, either digital or analog
• (Optional) Air pump to oxygenate your reservoir (not necessary for this system, but may improve yields)
Step-by-Step Guide
Being one of the more self-contained operations on this list, setting up an ebb and flow system shouldn't cause you much headache at all.
1. Assemble or find a structure that can hold your flood tray, allowing it to connect to your reservoir as well. Ensure it’s high enough off the ground to allow the reservoir to slide under, and strong enough to hold a flood tray filled with potted plants and nutrient solution.
2. Drill two 35mm holes side by side into the bottom of the flood tray, and place the fittings into the holes. The rubber stopper and barbed end should point upward and downward respectively.
3. Attach 2–3 extensions to one of the fittings, and just one to the other. Put a specialised ebb and flow screen over the top of the more extended fitting, and it’ll be ready to control overflow. No screen is needed for the other, though, as it’ll serve as the connection to the water pump.
4. Open up the tote you’ll use as your reservoir and place your water pump inside. Then, attach a measured and cut piece of the tubing to the pump, connecting it to the bottom end of your shorter fitting in turn.
5. Fill your reservoir about halfway with plain water (no nutrient solution yet), and turn on your pump to see if there are any leaks in the system. During this stage, you’ll also want to see how high the water will get, as you’ll want to make sure the maximum water level doesn’t exceed the rim of your net pots.
6. Time how long you need the pump to run to get the water level right, and see how long it needs to be off for the water to properly drain. Ensuring this is vital, as an improper balance can lead to overfeeding or underfeeding your crop.
7. Once you’ve ensured the system is functioning and balanced, mix your nutrient solution into the water, place your potted plants into the flood tray, and get started.
Pros and Cons of Ebb and Flow Systems
Pros:
• Low cost
• Easy to assemble and maintain
• Nutritionally generous
Cons:
• pH is more susceptible to problematic fluctuations
• Pump breakdowns could kill your plants (you’ll be fine for some time if you use rockwool, but media like pebbles will let water slip through quickly)
Deep Water Culture (DWC)
Even more straightforward and self-contained than ebb and flow, deep water culture (DWC) systems involve keeping most of your plant’s root mass submerged in a constantly oxygenated reservoir of nutrient solution. No water pump to consider, no second tray or channel you need to put your plants in—just the reservoir, the plants situated on top, and an air pump for oxygen.
What You Need
Requiring one of the shorter shopping lists in hydroponics, gathering supplies for a DWC system should be a breeze:
• 200-litre plastic tote to serve as the reservoir
• Air pump (capable of 7–9 litres per minute), air stone, and connecting tubes
• Growing medium of choice (any of the ones we listed earlier will work)
Step-by-Step Guide
Given you need next to nothing as far as supplies, you won’t need to carry out many steps to get this all together.
1. Form holes in your reservoir that allow your net pots to fit snugly. Make sure you don’t pick a strain that’ll get too big for the reservoir to support, and don’t worry about situating more than two plants into one reservoir.
2. Drill a small hole on the side of your reservoir (closer to the lid) so you can run your air line through it. Then, measure a length of tube long enough to connect to your air pump outside, run through the side hole, and connect to an air stone situated at the bottom of the tote.
3. With that done, just situate your air pump outside the reservoir, place your air stone inside of it, attach the tube to the pump, run the tube through the hole, and connect it to the stone.
4. Then, fill the reservoir with your nutrient solution and make sure the pH is optimised.
5. After that, with your net pots situated and filled with growing medium, place your plants inside and get things started! You’ll have to make sure they’re fed before they can reach the solution with their roots, but they’ll be fine after that, and growth will kick off quickly.
Pros and Cons of Deep Water Culture (DWC)
Pros:
• Affordable
• Simple and clean-cut
• Low-maintenance and fewer factors to worry about
• Fast growth
Cons:
• pH or nutrient imbalances can occur, which can be an issue if not fixed promptly
• You’ll want a backup generator and extra air pump on standby, as power outages or pump failures can lead to roots drowning in the un-oxygenated water
Wick System
Keeping with the discussion of simple yet effective systems, wick systems are a great introduction to the world of hydroponics. It’s not quite as direct as a DWC system, but it’s very close, and the particular mechanics could make it better for you than any other method.
What You Need
While you’ll notice a particular material you won’t need with any other method, the basic supplies for this system are the same as most others:
• 200-litre reservoir (plastic tote)
• 100-litre grow tray with a raised edge
• Nylon rope that can be cut into pieces and serve as the wick
• Air pump that can work at a rate of 7–9 litres per minute, along with an air stone and tubes to connect the two
• Hydroponic growing medium of your choice
• Power drill (to create holes for the wick and air line)
Step-by-Step Guide
1. First, get a table or cart with a net design that’s tall enough for your reservoir to fit comfortably under. Make sure this cart is also large enough to fit your grow tray, and strong enough to hold it when it’s filled with your growing medium and plants.
2. Then, drill three evenly spaced holes in the lid of your reservoir. Ensure they’re big enough for the rope wicks to go through, but not so big that they slip out. Afterward, drill three similar holes in the grow tray so the wicks form a connection between your plants and the reservoir.
3. Next, drill a small hole into the side of the reservoir, toward the bottom. This will be where the tube connected to the air pump will slip in, connecting to an air stone you’ll place inside.
4. Measure and cut three equal lengths of nylon rope, which will serve as the wicks that’ll deliver nutrient solution from the reservoir to your plants in the grow tray.
5. Settle the grow tray into the table or cart, and run the ropes from the inside of the reservoir, through the lid, and into the grow tray.
6. Lastly, fill the reservoir with nutrient solution, fill your grow tray with your medium of choice, turn on your air pump, and get going.
Pros and Cons of Wick Systems
Pros:
• Highly efficient
• Inexpensive
• Easy to set up
• Moderated feeding pace means your plant won’t get too overwhelmed
• No dry periods to worry about
Cons:
• You’ll need an extra air pump on standby
• As the water doesn’t move much (besides being oxygenated), you need to keep conditions ideal, constantly
Aeroponics
Capping off this list, aeroponic systems seem quite strange at first, but they’re very effective when put together correctly. It essentially involves the roots being suspended in air as they’re periodically misted with nutrient/water solution. The system only delivers as much nutrients and water as the plants need, and the constant air exposure ensures they can breathe.
What You Need
There are various ways to set up an aeroponic system, but we’ll focus on a single-plant setup for now to give you a clear idea of the base mechanics:
• Water pump that can push around 1,200 litres per hour (along with compatible tubing)
• Electronic timer that can be connected to the pump and set to a specific, constant cycle
• Sizeable net pot with lid
• Threaded poly cut-off riser (30cm in length with a 1.25cm diameter)
• Saw (to cut the poly cut-off riser down to size)
• 1.25cm sprinkler head that can spin 360 degrees
• Electric drill with a hole saw attachment (should have a smaller diameter than your net pots)
• Safety glasses (for when you’re working with the saw)
Step-by-Step Guide
To give you a better sense of how this all comes together, let’s go through each step required to get your plants growing aeroponically.
1. Drill a hole into the centre of the bucket using the hole saw attachment, ensuring the hole is slightly more narrow than the diameter of your net pot. This, of course, is to ensure it can fit neatly but tightly in place.
2. Take the lid off, and place the water pump into the bucket. Once it’s in there, screw the riser to the pump, and cut it down a couple notches so it’s situated decently below the area into which the roots will grow. Once that’s done, attach the sprinkler head.
3. Connect the pump to the timer, and set it to a constant 30-minute on/off cycle.
4. Pour around 8 litres of nutrient solution into the bucket, and place your net pot (containing your young cannabis plant) into the top hole.
5. Turn the pump on, and make sure you monitor the cycles, pH, temperature, etc. as it runs.
Pros and Cons of Aeroponics
Pros:
• You’ll never have to worry about plants getting enough oxygen
• Takes up very little space
• Paced-out sprinkler system ensures efficient use of solution (especially with no growing medium in the way)
Cons:
• Pressure of constantly monitoring the pH and temperature of your system can be a lot to handle
• Since your plants only have the sprinklers to rely on for nutrients and water, any leaks or pump failures can prove disastrous
Best Nutrients for Hydroponic Cannabis
Regardless of the system you pick, however, you’ll need to have a very clear idea of what nutrients your plants will need in a hydroponic system. So, what makes a certain nutrient preparation better for plants in a soilless system?
• Has the ideal ratio of nitrogen, phosphorus, and potassium (NPK ratio) depending on whether your plants are in the vegetative or flowering stage
• Minerals are used as the nutrient source, rather than organic material, and said minerals are chelated to make their internal nutrients more accessible
• Loaded with micronutrients
• Specifically formulated for hydroponic systems, and labelled as such.
Along with the others we mentioned earlier, your choice of nutrient solution should also always include sulfur, calcium, iron, and magnesium. Other micronutrients, like copper, manganese, boron, and zinc, will also fit in nicely.
Now, in a tight spot, you may think that nutrient solutions designed for soil will work just as well, but this is very much not the case.
See, among other differences, hydroponic nutrients contain more micronutrients (to make up for what would normally be in soil), higher nitrogen and lower phosphorus levels, which are key, and the minerals are made easier for the plant to access. Those made for soil, however, lack the extra micronutrients, have an inappropriate nutrient balance for hydroponics, and contain organic material that can lead to bacterial and fungal formation in your system.
Considering that, to stay safe, you should only be looking for nutrients that are explicitly stated as being designed for hydroponic systems. If it’s not clear, ask a store worker or the manufacturer, and be wary of any support staff that don’t treat it as an important factor.
Should I Use Hydroponics for Indoor or Outdoor Growing?
If you want to grow weed hydroponically outdoors, the first thing to consider is whether your climate is suitable. The further north (or south, in the Southern Hemisphere) you are, the shorter your potential growing season will be.
First, acquaint yourself with the basics and challenges of both indoor and outdoor soil growing before attempting hydroponics in either setting.
Advantages of Growing Marijuana Hydroponically Outdoors
If you are able to grow weed outside for even part of the year, it can offer some benefits over indoor growing. The major benefit is, of course, the sun. Plants adore natural light and natural light cycles, and you’ll find them growing big and fast under natural light. Plus, you’ll save money on lighting!
Growing marijuana outdoors also keeps a nice, healthy flow of air moving around your plants and their roots. Plants love fresh air.
Disadvantages of Growing Marijuana Hydroponically Outdoors
Equipment can perish quickly beneath the withering rays of the sun. Plastics that aren’t designed for intensive UV environments will degrade outside, so the equipment must be insulated against this.
Outdoors, you are beholden to the weather. So, if you get a cold snap or lots of rain, this can spell doom for your crop. Also, it is harder to control pests outdoors. Indoors, it is much easier to maintain a clean, managed environment.
Advantages of Growing Marijuana Hydroponically Indoors
If you grow weed indoors, you retain massive control over your operation. Whether you’re talking light levels, hydration, temperature, pests—you name it—you can control it.
Disadvantages of Growing Marijuana Hydroponically Indoors
That being said, that amount of control is neither easy nor cheap.
Setting up a lighting system that can be moved, a ventilation system, temperature and humidity control, etc. takes some investment. And you'll need a grow room that can fully support all of this.
Is It Possible To Grow Weed Organically With Hydroponics?
Growing cannabis organically is something many growers want to do, and with good reason. But can a hydroponic grow be organic? On a technical level, this is a difficult question to answer, because a lot of the definitions around organic techniques focus on the maintenance of healthy soil.
However, if we broaden the remit and ask, “Can hydroponically grown cannabis be environmentally friendly?”, then the answer is a resounding yes.
Hydroponic grows use about 10% of the water used in soil grows, and this is a massive reduction. In total, it can be a highly efficient process with very little wastage.
Best Strains To Grow Hydroponically
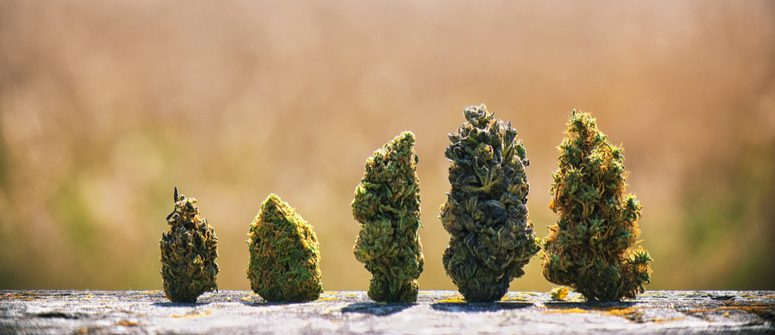
Now that you have a better idea of how to work with each hydroponic system, and how to properly feed your plants, it’s time to start thinking about what exactly you’ll be growing in your space.
You can grow pretty much any strain, yes, but there are particular cultivars that thrive when grown hydroponically.
AK-47
Kicking things off with a classic, AK-47 has been beloved by stoners for generations, and it’s clear to see why. This descendant of unnamed Colombian, Afghani, Mexican, and Thai strains boasts a punchy terpene balance and an invigorating high.
AK-47 is a favourite among hydro growers for her medium size and consistently high yields. And, while she can do well outdoors, many tend to stay inside since it allows them to control the temperature and achieve the densest possible buds. Give her around 8–9 weeks to flower, and you’ll be rewarded with 350–500g/m².
Cheese
Another classic you’ll find in the stashes of young and old stoners alike, Cheese is a descendant of Skunk #1 that improved on many aspects of the original pungent powerhouse. Like its parent, Cheese hits the nostrils with an intense skunky aroma, reminiscent of Roquefort, and hits the tongue with an equally cheese-tinged flavour.
Hydroponic growers salivate over this ultra-robust, fast-flowering titan. Give this strain about 8 weeks to flower, and you’ll see your plants climb to 150cm and yield around 450–500g/m².
Critical Kush
Critical Kush is the lovechild of Critical Mass and OG Kush, hence the name, and it not only lives up to the legacies of both, but may even surpass them, depending on who you ask.
Along with yielding potent nugs containing as much as 25% THC, Critical Kush plants are also quite generous, offering about 550–650g/m² of buds to hydroponic growers. Those yields are especially impressive when you consider they come from plants that don’t exceed 110cm. Just give her around 8–9 weeks to flower, and watch as your plants thrive in their hydro home.
Growing Weed the Hydroponic Way: Which System Will You Choose?
We hope this breakdown of the process and your potential options has made you feel confident in your future as a hydroponic grower.
It’ll take some time to get used to things, sure, and you could really benefit from the help of an experienced hand. But there’s no shame in that! Once you get your system down, you’ll see your weed plants growing taller and stronger, offering buds that are denser and more potent than any you’ve ever grown before. Just take things easy, prepare well, and pay close attention to your plants!
