


Working with a budget is one of the biggest barriers in the way of aspiring cannabis growers. There are lots of initial investments, and costs can quickly add up. Building your own grow tent, however, can save you some precious cash. In turn, a DIY grow tent also allows you more control over your growing operation. Here's how to make your own.
Contents:
When people first research the costs that come with growing cannabis, they're often surprised at the initial investment required. Along with lamps, fans, tools, and the like, many choose to get themselves a grow tent.
Those who decide to buy one from a store may find themselves spending hundreds of euros. While you can make it back in the long-run, there’s no denying that’s a lot of money to spend at once. You may also find that even the best grow tents available don’t exactly fit your space or situation.
But what if you built your own grow tent? DIY grow tents not only cost less than pre-designed equivalents, but can be tailored to your growing needs. Sure, you have to dedicate some time and effort to building it, but it’s easier and far more worthwhile than you might think.
We’ll break down the advantages and disadvantages of DIY grow tents as we proceed, and show you precisely how you can assemble your own.
SHOULD YOU BUILD YOUR OWN CANNABIS GROW TENT?
To start, you’re likely wondering whether DIY grow tents are what’s best for your scenario. As great as they can be, they’re not perfect for everyone. To help you figure out where you stand, let’s take a closer look at the pros and cons.
ADVANTAGES OF DIY GROW TENTS
• Simple assembly: While you might suspect the process to be complicated, building a grow tent is fairly straightforward. Along with that, you can always look at the designs of any effective grow tent on the market and model your own off of that. There aren’t many parts involved, as you’ll soon see, and they come together in a fairly clear manner.
• Custom dimensions: Since you’re putting everything together yourself, you’ll be able to pick the height, width, and precise shape of your grow tent. Instead of having to cater to the dimensions of a pre-made tent, your tent will cater to you.
• Full control of plant conditions: In turn, just as you can control the exact shape and dimensions of your grow tent, you can control exactly what it’s like inside. Humidity, temperature, and airflow are all in your hands.
DISADVANTAGES OF DIY GROW TENTS
• Requires more time and effort: Naturally, building a grow tent from scratch requires more effort than ordering one online or picking one up from the store. It’ll also take a good few hours longer than putting together something that’s pre-designed and laid out.
• May be less durable: While we have faith in you as a tent builder, it’s not crazy to say that professional manufacturers are better at streamlining the process than the average person. Mistakes and product defects are possible with prefabs, yes, but they’re less likely. Build your own tent, however, and you may find yourself making mistakes with your first few iterations.
• Design mistakes are risky: Going along with the previous point, making mistakes when assembling your tent could lead to diminished yields at best and dead cannabis plants at worst. Lights leaks from outside the tent, in particular, can threaten the success of your grow by interrupting the crucial flowering phase. In turn, care and attention are nothing short of vital in the assembly process.
HOW MUCH DOES IT COST TO BUILD YOUR OWN CANNABIS GROW TENT?
If you’ve decided that a DIY grow tent is exactly what you need, it’s time to plan out your budget. With that considered, the driving question will obviously centre around cost.
As with every other aspect of DIY grow tents, the cost is largely dictated by your needs and the materials you choose. Considering the main materials involved are some sort of cover material and PVC pipes, you may end up spending as little as €25 on the tent itself. You can easily spend more money if you use nicer materials, but the basic setup is fairly accessible.
Keep in mind, that estimated cost doesn’t count lights, fans, and other environmental control technologies. Those don’t usually come included with prefab grow tents either, though, so they’re considered a separate cost. That being said, you may save money on some of those things if you design your grow tent especially well.
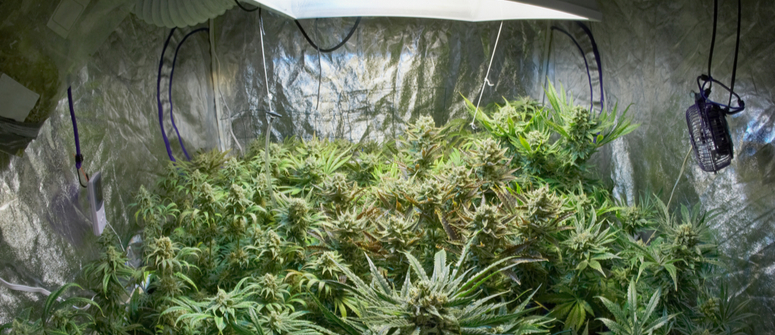
WHAT SIZE SHOULD MY GROW TENT BE?
Like cost and materials, the size of your grow tent will be entirely up to you. Certain strains, however, have size requirements that your tent will need to fulfil. After all, outside of using training techniques, you can’t make a seed grow into a smaller plant than it’s naturally going to.
If you’re having trouble figuring out the exact dimensions you should go for, just consider the dimensions of commercially available grow tents and the specific strains you want to grow. For reference, many hobby growers will select a tent with floor dimensions of around 1.2 x 1.2m and a height of around 1.8–2.1m.
Don’t feel compelled to stick to those exact dimensions, but instead consider the space you have available. Just keep in mind that you need enough vertical and horizontal space to access your plants and move around. You’ll also want to make sure there’s enough space between the plants themselves, and between the canopy and the grow light(s).
HOW TO BUILD A CANNABIS GROW TENT
With your desired cost and dimensions in mind, it’s time to assemble your cannabis grow tent.
MATERIALS
To start the process, you’ll first need to gather your materials. To build a standard cannabis grow tent, you’ll need:
• Several metres of PVC pipe with 2.54cm opening
• Eight PVC corner pieces that can fit the pipes
• Covering material of choice (reflective for indoors, transparent/semi-transparent for outdoors—to recreate a greenhouse)
• Three large velcro strips for the door.
TOOLS
• Sewing needle
• Large spool of robust thread
• Hand saw
• Super glue (permanent glue)
• Duct tape (optional)
DIRECTIONS
With everything in hand, you’re ready to begin the actual assembly.
1. Start creating the skeleton of your tent out of PVC pipes. Cut them into equal-sized pieces with your hand saw, using the corner pieces to form the bottom foundation. Next, form the four main columns of the structure so they stick out from the base, then connect them at the top using the other corner pieces and pipe. You should end up with a cuboid frame for your tent.
2. Now, measure out your covering material, ensuring it’s a good bit larger than the minimum required size. Remember, you don't want any light leaks.
3. Using your needle and thread, sew the covering into place. It’s ideal to have another person help you stabilise the tent as you go, but you can definitely do it solo.
A great way to do this solo is to drape your covering over the frame and tape it down at the top to hold it. You can then drape the next side and tape down, and sew them both together. Repeat all the way around, and for top and bottom covers. If this is an indoor tent, make sure the reflective side of your material is facing inwards. Your sewing needs to be such that it ensures there is no light leak.
4. Cut out your door and airflow openings and use extra covering material to make a door that overlaps with the material of the tent. Sew it to the top, and then use the three velcro strips to create a seal around the other three sides of the door. You should then have a light-proof and secure door you can peel back.
5. Hang up your grow light(s) on the ceiling pipes, add your ventilation tubing, and secure around the airflow openings you cut to add them. Something like black duct tape can help here. The end result should be a basic but functional grow tent!
Note: You can use the super glue to make this structure more durable and light-proof, but that means you won’t be able to disassemble it when you're done, which is the main draw of DIY tents for many.
TOP TIPS FOR BUILDING A CANNABIS GROW TENT
If you’re feeling fully ready to build your tent, we have a few more top tips to keep in mind before and while building your cannabis grow tent.
EXAMINE YOUR TENT THOROUGHLY BEFOREHAND
Before growing anything in your tent, you need to thoroughly examine it to ensure it's fit to house your plants. Primarily, you have to make sure that no light will leak in during the dark period. Additionally, you’ll want to check that there is enough space for plants to mature—horizontally and vertically—without getting too close to the lights or each other. All these variables and more need to be considered before the first day of planting.
USE COOLER LIGHTS
As it goes with any grow tent, the interior can get quite warm as you start to use the lights. To minimise this issue and control the risk of fire, we suggest smaller, cool-running LEDs or similar. Traditional MH and HPS lights can run a little too hot for small-scale growers especially.
OPTIMISE AIRFLOW
Naturally, if you just throw the cover over the pipes, cut out a door, and call it a tent, you’ll have lots of problems with airflow. Poor airflow will not only make it feel awful in your tent, but could lead to excess moisture, mould, and eventual plant death. In turn, you’ll want to ensure you have systems in place that allow for sufficient fresh air exchange. In other words, go a step further and install a basic air filtration system instead of just cutting holes in the side.
SELECT DURABLE STRAINS
Lastly, while we’re sure your tent will be great, we suggest growing some more durable strains the first time around. If something goes wrong along the way, you won’t be massively punished for it, and you’ll still have buds to enjoy while you figure out how to make the next grow better. For example, if you’re afraid of light leaks thwarting your grow, select autoflowers; changes in light cycle won’t bother them!
