


Going away and not sure how you will keep your beloved cannabis plants watered? Don't worry; we've got multiple DIY options you can try to ensure indoor and outdoor plants stay hydrated.
Contents:
Cannabis plants need water to survive, but there may be times when you aren’t around to give them the hydration they crave. Suppose you have to go away unexpectedly, or your grow took longer than expected and now you're on vacation for two weeks. If that’s the case, don’t panic—it doesn't have to mean sacrificing your beloved plants.
How to water cannabis plants while you're away: DIY options
With some know-how and planning, you can easily keep plants watered while you're away, without relying on a friend or neighbour. Below we've outlined several cost-effective DIY methods for maintaining hydrated plants, each with a clear step-by-step guide.
Wick system
Straightforward and cheap, you can use a wick to keep plants hydrated for several days—great if you're only going away for a weekend. You could use a wick system to keep plants watered for a week, but it’s only really suitable for 1–2 smaller plants that need a steady but minimal amount of moisture.
How to
Step 1: Assuming you've only got 1–2 plants to worry about, you'll need to procure two Mason jars (one for each plant), scissors, and a length of nylon or cotton string that can hold water.
Step 2: Position the Mason jar next to your potted cannabis, but don't fill it with water just yet, as you need to cut the string to the correct length. To do that, place one end in the Mason jar, and ensure it reaches all the way to the bottom.
Step 3: The other end of the string must be long enough to penetrate the soil of your cannabis plants. Ideally, you'll want the string to go about three inches (~8cm) deep. Cut the string to length, then remove any excess.
Step 4: You'll want to ensure plants are well-hydrated before filling the jar with water; otherwise, the water level will drop before you return from your holidays.
Step 5: You also need the top of the Mason jar to be higher than the top of your plant pot. If it isn't, use a small bolster, such as another jar or a book.
Step 6: Fill the jar with water, and double-check that the string is submerged and still reaches the bottom of the Mason jar. Water should now travel along the string, hydrating soil as and when the plant needs it.
Plant bath
A plant bath is a good option if you know temperatures will peak while you are away and your cannabis needs more water than usual. However, under normal circumstances, a plant bath can cause more problems than it solves because roots remain submerged in water for an extended period.
How to
Step 1: Source a container large enough to house your plants. If you can't find anything suitable, or you have several cannabis plants that need watering, then you can just use the bathtub. If you're worried about scratching the bathtub with your plant pots, first line the inside with several towels.
Step 2: Fill the container or bathtub with roughly 5–8cm of water. You'll want the water level to reach just about the base of your plant pots. You'll also need to double-check that your pots have holes in the bottom to soak up the water. If not, it's essential you add some.
Step 3: Your plants can now draw water through the bottom of the pots, keeping themselves hydrated. To help limit issues with root rot, consider using fabric pots or adding perlite to their soil.
Saucer with water
Using a saucer to submerge the bottom of your plants' pots is a much milder version of the abovementioned plant bath. Its suitability will depend on how long you're away and how well your plant deals with moisture, but for most cannabis growers, it is likely a better option.
How to
Step 1: Place your cannabis plant on a deep-lipped saucer. If you're away for a day or two, a saucer just over the diameter of your pot will be fine. To hold more liquid for longer periods, you'll need a larger saucer.
Step 2: Fill the saucer with water, gradually topping it up until the soil stops absorbing liquid through holes in the bottom of the pot and you can fill the saucer entirely. You now have a reservoir the plant can rely on while you're away.
Bottle-in-the-ground system
If your weed is growing outdoors, don't worry—there are still plenty of DIY watering options if you have to go away. One of the first to try is the bottle-in-the-ground system, which is great for thirsty plants and large grow-ops. For larger gardens, the default option is a 2l plastic water bottle.
How to
Step 1: Using a hammer and nail, create 2–3 holes in the bottom of a 2l plastic water bottle. Next, do the same on one side of the bottle, adding 3–5 holes. The number of holes affects the flow rate, so larger plants need more holes.
Step 2: Dig a small hole several inches from the base of your cannabis plant. The hole needs to be deep enough to accommodate the 2l water bottle. You want to bury the bottle, exposing the neck slightly (3–6cm).
Step 3: When you place the bottle in the ground, make sure the side of the bottle with holes faces your plants. To prevent the bottle from emptying too fast, water your cannabis and the surrounding area.
Step 4: Fill the bottle to the top with water of your choice, and relax as your plants receive steady hydration.
Step 5: A bottle-in-the-ground system should keep plants watered for several days, but as an extra precaution, you can remove the bottle cap, and any rainwater should naturally top up your DIY reservoir.
Upside-down bottle
This approach is another fantastic, low-budget option for outdoor growers, as it can provide enough water for several days. For small-scale grow-ops, you can use a 500ml or 1l bottle.
How to
Step 1: First, ensure your outdoor cannabis plants are well-watered. Not only will this make it easier to insert the water bottle, but it'll also stop plants from using all of the water inside the bottle before you return.
Step 2: Using a sharp-pointed knife, or a sturdy sewing needle, poke several holes in the cap of your chosen water bottle. The more holes you add, the faster it will dispense water, so you may need to experiment first to find the correct flow rate.
Step 3: Fill the plastic bottle with water (rainwater, groundwater, or tap water) and replace the cap. Place your thumb over the top of the bottle.
Step 4: Pick a spot a few inches from the base of your plant, and just before you push the neck of the water bottle into the soil, remove your thumb. Try to submerge the entire neck of the bottle.
Step 5: If your soil is tough to work with, consider digging a small hole first and placing a brace to stop the bottle from falling over once it's in the soil.
Step 6: Once the water level has settled, mark the bottle with a permanent marker so you have a reference point. Your plants will now have a steady-dripping water supply.
Plastic bag construction
Keeping plants hydrated with a plastic bag is especially useful for young, potted seedlings (or early-stage vegetation), as they typically handle greater relative humidity without succumbing to rot or mould.
How to
Step 1: Start by pre-soaking a medium-sized cloth or towel. Then, place it inside a clear plastic bag that's large enough to fit the cloth and your potted cannabis plant.
Step 2: Place your cannabis plant inside the plastic bag, positioning it on top of the damp cloth. Give your plant a generous watering while it's inside the bag, as this will help to trap even more moisture.
Step 3: Loosely tie the top of the plastic bag, ensuring there is enough air inside to prevent the edges of the bag from touching your plants' leaves.
Step 4: Position the cannabis plant away from direct sunlight and sit back as your plants take care of themselves in their mini greenhouse. The plastic bag method should be suitable for several days of steady hydration.
Commercial options for watering cannabis while being away
So far, we've focused on DIY watering options that almost anyone can try. However, some growers may have an entire room dedicated to cannabis or have several plants at different cultivation stages. If this is the case, there are a handful of commercial-focused watering options.
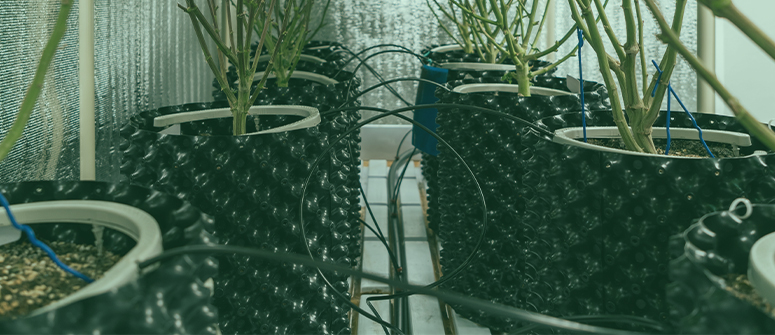
Irrigation system
Irrigation systems take the concept of our wick and bottle-in-the-ground systems one step further. Not only do they provide a consistent supply of water to plants, but they work with both soil and hydro-based grow-ops.
A line or drip irrigation system is the most common among cannabis growers, with several metres of tubing running around the base of plants. After staking the tubing in place, growers typically punch 1–3 holes in the sections of tubing that run directly across the tops of plant pots and add pressure-compensating water drippers.
The entire system is then connected to a water reservoir and a pump to create a steady supply of dripping water. You can also consider taking automation one step further by adding a Wi-Fi timer and controlling the whole process from your phone.
Self-watering system
The principle of self-watering systems is similar to that of irrigation systems, but it usually includes more than just drip lines. It's possible to set up a timer-related system that includes rotating sprinkles, drip feeders, trickle lines, and much more.
All of this can be controlled from a central unit, meaning once the system is installed, it's simply a case of periodically checking on plants to ensure the optimal watering schedule. For nearly all home growers, a system this extensive is unnecessary. Still, it is an option to be aware of, especially if you plan to be away from your plants for extended periods.
Watering when away: Care for your cannabis plants all year round
Leaving your plants to fend for themselves may seem daunting, but with the proper setup, it's possible to keep plants sufficiently watered. You can even add liquid nutrients to the methods outlined above to ensure plants get both the hydration and the nutrition they need.
The trick is experimenting with the different methods to find which option best suits your grow-op and the period of time you'll be away. With a common sense approach, there's no reason you can't have a weekend away while your cannabis plants remain healthy and happy with all the water they need.
