


After months of care, your prized cannabis plants are finally ready to harvest. While this may seem like the end of your cannabis cultivation journey, there are a few crucial steps left to tackle. Keep reading to find out what you need to know about drying and curing cannabis.
Contents:
Although some cannabis growers overlook drying and curing, both are fundamental to getting the most out of your buds. And by “most” we mean the best possible flavour and strongest high.
Of course, there's nothing stopping you from smoking fresh buds immediately after harvest; but, having come this far, what are a few more weeks in exchange for a smoother smoke and a significantly better experience? With that in mind, let's not waste any time and jump straight into our definitive guide. First up, the key differences between drying and curing.
What's the Difference Between Drying and Curing Cannabis?
Although drying and curing appear the same on the surface, they both play a vital (but slightly different role) in realising the potential of your buds.
• Drying
The drying process comes immediately after harvesting your cannabis plants. It helps remove surface moisture from the buds (about 10–15%) and speeds up chlorophyll's breakdown. Chlorophyll is a green pigment that plants use for photosynthesis.
Unfortunately, chlorophyll also gives buds a harsh flavour, so, for the best smoke, you'll want to wait until virtually all of the chlorophyll and excess moisture is gone. While drying, buds will shrink dramatically in size, but don't worry; this is perfectly normal.
• Curing
Curing comes after drying, and takes the manipulation of bud moisture one step further. Curing is about striking a delicate balance between completely drying buds out and retaining just enough moisture that they don't start to crumble and degrade.
The curing process also occurs over several weeks or months to ensure the smoothest smoke, and helps your weed stay fresher for longer, without going off or losing potency.
Why Do You Have To Dry and Cure Your Cannabis?
We've alluded to this already, but both drying and curing maximise the potential of your cannabis buds. But, what do we mean by that exactly? Well, both processes help buds with the following:
- Improving taste and aroma
- Removing excess moisture and chlorophyll
- Enhancing cannabinoid content (greater levels of THC, CBD, etc.)
- Offering a smoother smoking experience
- Improving longevity, thanks to a lack of sugars and starches (both attract bacteria)
How To Dry Your Cannabis
If you're a weed grower who's previously overlooked drying and curing, don't worry. With a few minor considerations—all of which are straightforward and require little to no extra commitment, other than time—you can dry your buds to perfection.
Where To Dry, and Where Not To Dry, Cannabis at Home
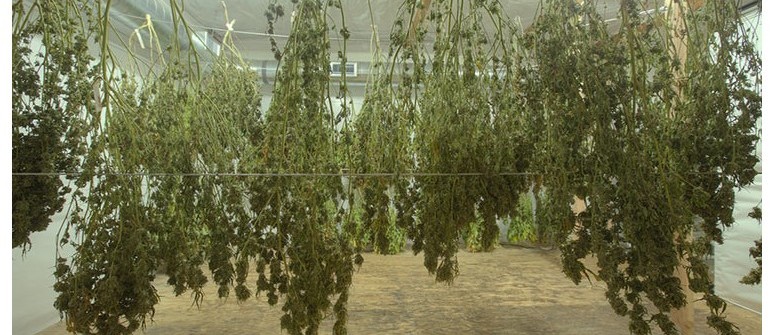
The first important consideration for drying is location. Leave your buds to dry in a suitable place, and the environment will do a lot of the heavy lifting for you. Pick the wrong spot, though, and disaster can strike—so getting the balance right is crucial.
For most home growers, the best option is to leave buds in your grow tent after harvest. The simplest option is to use a coat hanger or string tied to the inner frame of your tent. Purpose-built drying racks are also available online, and you can simply hang them from the same spot as your lights or extractor.
Both methods work perfectly fine for drying, and keeping buds in a grow tent offers some protection from external factors such as sunlight exposure and excessive temperatures.
Other options include:
- Climate-controlled drying box
- Open paper bag
- Humidity-neutral grow space
Above all else, remember that the location in which you dry your buds needs to offer a consistent environment, with no wild swings in temperature or humidity level. Otherwise, you risk kissing all your hard work goodbye. You'll also need plenty of airflow, so sealing buds inside a jar or container is a no-go for drying.
Best Environment for Drying Cannabis
Speaking of a balanced environment, what exactly are the ideal conditions for cannabis drying? Optimal drying comes down to four major factors: temperature, humidity, air circulation, and light exposure.
- Temperature: Start with temperatures around the 20°C mark, for about three days, before dropping to 17 or 18°C. The key here is to keep temperatures consistent and drop slowly so buds don't dry too quickly.
- Humidity: Sticking with the three-day principle, the relative humidity for the first 72 hours should be around 50%. However, once the three days are up, you’ll want to increase the humidity level to roughly 60%.
- Air circulation: Wherever you store your buds needs to have decent airflow. Don't point fans directly at buds, as this will dry them out too quickly, but ensure there is plenty of fresh air flowing in and around your harvest.
- Light exposure: When it comes to light exposure, the darker, the better. Light, specifically sunlight, will degrade your buds' THC content over time and accelerate the drying process. If you are drying inside a grow tent, keep major openings zipped shut to prevent exposure.
Here are a few troubleshooting tips if you're struggling to strike a balance between the different elements highlighted above.
- Temperature below 20°C: Use a dehumidifier, humidifier, or heater
- Temperature above 20°C: Use an air conditioner or evaporative cooler
- Humidity below 50%: Use an evaporative cooler or humidifier
- Humidity above 50%: Use a dehumidifier or air conditioner
Drying Cannabis: Step-by-Step Guide
To keep things simple, we're going to outline the most conventional approach to drying cannabis buds. You'll need very little (if any) extra equipment, and our step-by-step guide will make use of the space you already have—your grow tent.
- The first step is the simplest; remove each branch from the main stem. If you're not sure how to trim cannabis plants, you have two options: wet trimming and dry trimming. For this guide, we'll stick to wet trimming.
- With a stack of freshly harvested cannabis buds in front of you, it's time to remove excess fan leaves. You can also remove the smaller sugar leaves on the buds. Ultimately, the fewer leaves, the smoother the taste.
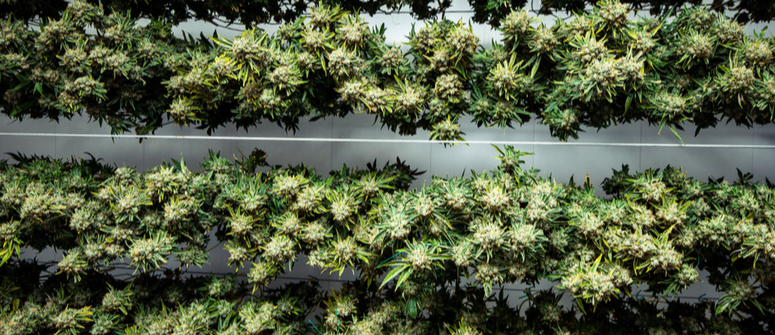
- What you should have now are several branches of trimmed cannabis buds. With the preparations complete, it's time to hang the branches from inside the top of your grow tent. Use a piece of string secured along the top, or a clothes hanger—both will do the job just fine.
- Optimal drying conditions are a temperature of roughly 20°C and a relative humidity of 50%. If your tent meets these requirements, the next part is easy. You just have to wait!
- Check buds regularly to see how the drying process is progressing. Slow and steady is the best approach for cannabis drying, so if buds appear dry and brittle or damp and soggy, conditions are probably off. Use our troubleshooting tips until you hit that drying sweet spot!
How Long Does It Take To Dry Cannabis?
Buds left to dry in a grow tent should be ready after 7–10 days. Properly dried buds should feel dry to the touch, and small stems will snap rather than bend.
Just remember that with dozens of factors affecting how quickly or slowly buds dry—it's a process that takes a lot of practice to get right. Don't be disheartened if you don't get it spot on; just keep a note of any mistakes, and make the relevant adjustments next time.
How To Cure Your Cannabis
Nothing is stopping you from taking your newly dried buds, grinding them, and getting your 420 blaze on. But, if you can hold out a bit longer, curing will bring your buds' flavour and potency to life.
What You Need for the Cannabis Curing Process
Just like drying, curing doesn't need a lot of extra equipment. It's mostly about patience and making minor incremental adjustments as buds cure. That said, several mason jars and a handful of humidity packs make the job of curing significantly easier. You'll also want a cool, dry, and dark location to store your bud-filled jars while you wait for the flowers to cure.
Best Humidity Level for Curing Cannabis
The optimal temperature for cannabis curing is the same as drying—roughly 20°C—however, with curing, we need to increase humidity slightly—about 60–65% is perfect. If you don't have any tells to measure humidity, here are a few handy tips for getting buds in the “cure zone”.
- If buds feel wet: Leave buds outside the jar for 12–24 hours; they still need longer to dry.
- If buds feel moist: Leave the top off your curing container for a couple of hours.
- If buds feel dry: Don't change anything! You're in the “cure zone”.
- If buds feel brittle: Add a humidity pack to restore some moisture.
Humidity packs are perfect for maintaining the right conditions, so make sure you have plenty on hand. If you have a bumper harvest, you'll need at least one in every jar.
Curing Cannabis: Step-by-Step Guide
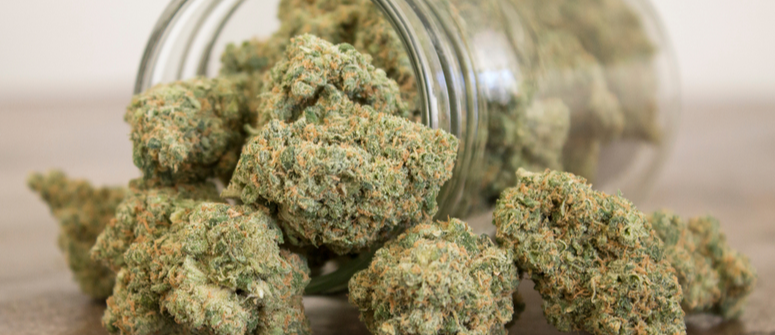
With several mason jars, some humidity packs, and recently dried buds in hand, it's time to perform one final trim so we can move them into containers and start the curing process.
- As mentioned, trim buds entirely so no branches or stems remain. Not only are stems useless now, but they make it harder to fit your buds inside a container or jar.
- Next, place buds (loosely) inside your chosen container. Although wide-mouth mason jars are ideal, any airtight container is suitable. Fill the jars until there's a small gap at the top, and make sure you aren't crushing or compacting buds unnecessarily.
- Repeat step two until all of your buds are in containers, then move said containers to a cool, dark, and dry location away from extreme temperature fluctuations. While you're at it, it doesn't hurt to throw a single humidity pack inside each jar.
- For the first week, you'll want to open each container several times a day, although only for a few minutes. This gives the buds a chance to breathe, replacing the air inside the container. At first, the process is quite labour-intensive, but you won't have to open the jars as frequently after the first week.
- For the next 2–4 weeks, you only need to open the jars and refresh the buds every few days. Once the curing period is up, it's time to get your smoke on! When you aren't rolling a fat jay, keep the jars tucked away in a stable environment to make sure buds stay fresh.
How Long Does It Take To Cure Cannabis?
You can't really over-cure your cannabis, and, although the minimum curing period should be around 2–4 weeks, some buds don't reach their full potential until 4–8 weeks—something to keep in mind. Some growers even swear by a six-month curing period, but it all comes down to personal preference. Just remember to keep opening jars once or twice a week if you go for an extended cure.
What To Do After Successfully Drying and Curing Cannabis Buds
Unless you're channelling your inner Snoop Dogg, going through your entire well-cured stash in one sitting isn't going to happen. And, with all the extra effort spent on the drying–curing process, it would be a travesty to let your hard work go to waste. To keep buds on point, proper storage is paramount.
Glass jars are the typical go-to, with most growers keeping buds in the same jars they used for curing. The only watch-out is sunlight exposure, so keep your container in a cool, dark, and dry location to maintain bud integrity.
If the only thing you have to hand are plastic baggies, these will do—in a pinch. However, we cannot stress enough how important storage is. After months of growing, drying, and curing, it'd be a shame to let those juicy, flavoursome buds dry out and crumble to dust.
And there you have it; drying and curing cannabis in a (rather large) nutshell. There's a lot of information to digest, but, with many growers accounting a bud’s final quality chiefly to these two crucial stages, it's worth taking the time and effort to perfect both.
