


Harvesting is the most-awaited step in cannabis cultivation. This article will walk you through the entire process so you can do it right. Whether you're a beginner or just need a refresher, you've come to the right place.
Contents:
- How Do You Know When Cannabis Is Ready To Harvest?
- What Do Trichomes Look Like When Cannabis Is Ready To Harvest?
- How To Check the Trichomes
- Preparation: What Do You Need To Harvest Cannabis?
- How To Harvest Weed: Step by Step
- How Often Can You Harvest Cannabis?
- Harvesting Cannabis for Beginners: You Can Do It!
After many weeks of tending to and caring for your crop, you’re ready to reap the fruits of your labour. It’s time to harvest your cannabis plants.
If you’re a veteran in the cannabis growing game, you’re likely familiar with the necessary steps. At first glance, you’ll have a good gauge of whether or not your beloved crop is ready for the chop.
But what if you’re a beginner who’s still finding your footing? How would you know if it’s harvest time? What are the signs you should look for? And most importantly, what is the best and most efficient way to harvest marijuana?
This article will divulge the answers to these questions and more. Whether you’ve been doing this for years or are just starting out, you will gain some valuable information on the final stages of your growing venture.
How Do You Know When Cannabis Is Ready To Harvest?
Let’s address a crucial point of harvesting: timing. You don’t want to harvest too early and risk diminishing potency, and you don’t want to do it too late and watch your buds fall victim to rot. You want that happy medium.
There are several ways to determine if your marijuana plants are ready to harvest. Here they are at a glance:
- Yellow leaves
- Strain type (sativa strains tend to take longer to flower than indica strains)
- Plump, mature buds
- Mature trichomes
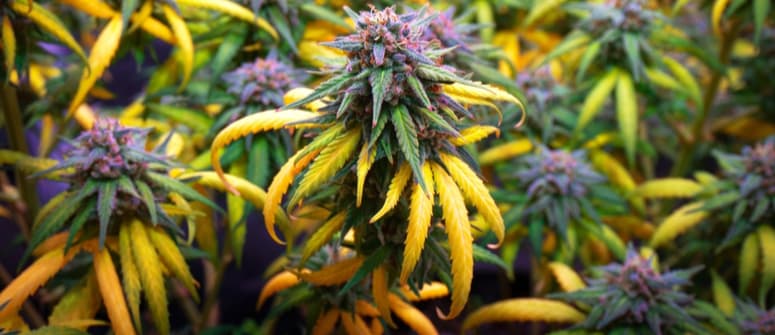
Using the naked eye, one of the first signs that harvest time is near is leaves starting to yellow and curl up. Some may even drop off completely.
Unlike the leaves, the buds should look plump and fully developed. The branches should also be a lot heavier. When eyeing up your buds, the wispy white hairs (pistils) that developed during the pre-flowering stage should now be more orange in hue, as they've matured.
Then, there’s the strain type to consider. Sativas usually take ten weeks or more to flower, while indicas tend to take around eight weeks. It’s only after these given periods that you should begin the harvesting process.
But the best and most reliable sign of a harvest-ready cannabis plant is mature trichomes. We'll get into more of this in the later sections of this article.
What About Autoflowers?
Generally, you can look for the same signs to determine whether your autoflowering marijuana plants are ready to harvest or not. However, it can be a bit more tricky.
For one, not all autoflowering strains lose their leaves upon maturation. Some don’t even change in colour. With these plants, making that confident declaration of “this is done!” could be more challenging.
So, how do you know if your autoflowers are ready for harvest? Wait two to three weeks after the predicted time. If, let’s say, a plant needs 10 weeks to be harvest-ready from seed, schedule your harvest at week 12 or 13. At this point, you’ll at least know you didn’t underestimate it.
What Do Trichomes Look Like When Cannabis Is Ready To Harvest?
We’ve previously mentioned the importance of trichomes in determining when to harvest your marijuana crop. And indeed, this is the most reliable sign of cannabis maturity.
But what exactly do you look for when using trichomes as your indicator?
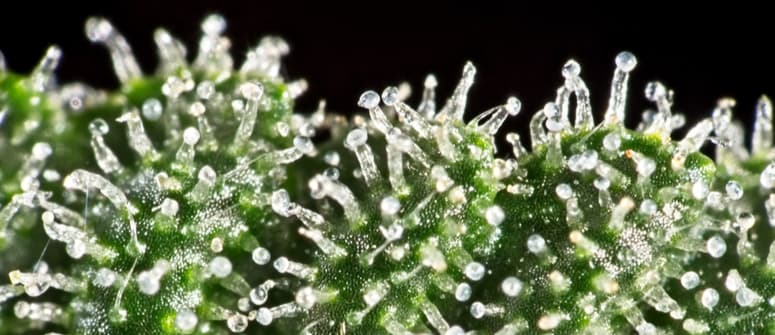
As a general rule, a cannabis plant that’s ready for harvest will display cloudy, milky-white trichomes. If your herb’s trichomes are still very clear, that means there isn’t much THC in it yet. Hence, the buds need more time to mature. However, once the trichomes turn amber, the THC starts to convert to CBN, a less-psychotropic cannabinoid, and thus the effects tend to be less energetic and potent.
That said, not all growers choose to harvest at the same time. It all depends on personal preference. Some look to optimise THC content and harvest when trichomes are cloudy, while others prefer the more relaxing and couch-locking effect offered by amber trichomes. Ultimately, while it’s fine for some trichomes to turn amber, you don’t want to leave it too long, or you risk losing a lot of the THC content.
Trichome readiness chart:
- Clear trichomes: Buds are immature
- Some cloudy and some clear: Still immature, approaching harvest
- Mostly cloudy: Peak THC concentration, ready to harvest
- Some amber and some cloudy: Harvest-ready, greater CBN content
- Amber trichomes: Harvest now
What Are Trichomes?
A quick Google search will tell you that trichomes are “fine outgrowths or appendages on plants, algae, lichens, and certain protists”.
For plants, in general, these little protrusions serve vital functions, such as protecting microbial organisms. They also help maintain a layer of still air on the leaf’s surface to prevent excess water loss.
In the case of cannabis, trichomes produce terpenes, cannabinoids, and flavonoids. These are the main constituents that give the plant its distinct aroma, flavour, and potency. And while these traits are useful to humans, they can help to drive away potential plant predators.
Can You Harvest Marijuana With White Pistils?
We’ve briefly mentioned the pistils (or stigmas) on cannabis buds as a potential indicator of cannabis maturity. This female sex organ of the cannabis plant is necessary for the pollinating process, but it also helps growers determine when to make the chop.
If you see white pistils, your plants need more time. Once they start to darken and curl up, you’ll know your plant is reaching maturity. That said, pistils are far less reliable than trichomes in determining if it's time to harvest, as multiple factors can influence their hue or shape.
How To Check the Trichomes
Knowing where the trichomes are is step one of the whole harvesting process. The more important step, however, is knowing what to look for. This section is all about the best ways to inspect trichomes to see if your cannabis plants are harvest-ready.
Trichomes: Where To Look
If you take a closer look at your plant's buds, you’ll see little mushroom-like structures all over the surface. They’re sticky to the touch, and also appear in smaller numbers on the leaves.
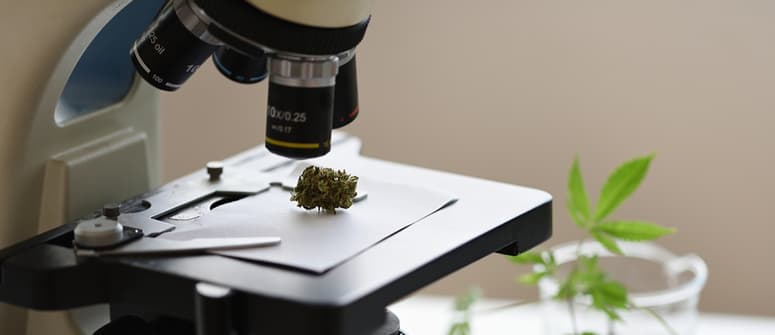
However, you won’t be able to see trichomes in full view just by looking at them. You’ll need the help of a magnifying tool.
What Are the Best Magnifying Tools for Looking at Trichomes?
The best magnifying tools for trichome observation are a jeweller’s loupe or a magnifying glass.
By simply hovering your loupe over the buds, you’ll have a much better look at the trichomes. It is now much easier to determine their shape and colour, and whether or not your crops are ready to harvest.
But if you want a bigger and clearer image, a digital microscope would be your best bet. This device will also let you record video, which you can repeatedly review when necessary.
The great thing is, all of these devices are relatively affordable. It’s a small price to pay for a more accurate gauge of your plants’ readiness.
Preparation: What Do You Need To Harvest Cannabis?
So, your trichomes are now milky-white and indicative of a harvest-ready plant. Now what? First things first, you need to make the pre-harvest preparations—just like how a chef would use mise en place to prepare an exquisite meal.
Materials
Prepare all the materials you’ll need for harvesting:
- Sharp shears: We can’t emphasise this enough. Many find it easier to use spring-loaded scissors, but most trimmers will recommend a pair of Chikamasa scissors. They’re not spring-loaded, but are believed to offer more precision.
- Latex gloves: Harvesting cannabis will leave thick layers of resin on your fingers if you use your bare hands. Save yourself that inconvenience.
- Apron: You wouldn’t want to ruin your clothes with some resin, now would you?
- Rubbing alcohol: Use this to clean your shears to prevent the resin buildup from solidifying. Rubbing alcohol works well in weakening the resin for easier wiping.
- String: This will be used to tie your branches for hang-drying. A piece of twine or clothesline works well too.
- Collection tray: This is both for stashing the trim and collecting the branches for decluttering.
Harvesting Cannabis: Day or Night?
Next, you need to decide whether you’re harvesting during the day or night.
The consensus is that harvesting during the darker hours, particularly at dawn, is the best move. For one, terpene levels are thought to be much higher right before the sun comes up. As cannabis crops soak up the sun during the day, resin production happens mostly at night. The production cycle then reaches its peak during these dawn hours.
Efficiency is another factor to consider here. Depending on the size of your operation, harvesting cannabis will take a few hours to complete. Starting early means ending early, leaving the rest of the day for other important obligations.
As for daytime harvesting, growers tend to stay away from it. During the day, moisture evaporates from the flowers, meaning they are drier and less juicy.
Final Flush
This is where many growers’ opinions part ways. Some swear by flushing as a form of harvest preparation, while others are fine doing away with it. But in case you don’t know what flushing is, allow us to explain.
Over the vegetative and flowering phases, cannabis plants take up a lot of macronutrients (nitrogen, phosphorus, and potassium) and micronutrients. These chemicals help plants boom in growth, withstand the elements, and flower magnificently. However, they can also compromise the final product, which becomes noticeable when smoking.
Flushing is the process of drenching the substrate with nutrient-free, pH-balanced water to remove that excess mineral buildup. Usually, this is done over a period of one to two weeks. The plant still gets to absorb and process the nutrients present, but it no longer stores the unwanted minerals.
This process is mainly for growers who use bottled nutrients. If you grow your crops organically, you can choose to skip this step, as it won't be necessary.
How To Harvest Weed: Step by Step
Now, let’s get to the meat of the topic and what you came here for. Here is our step-by-step guide to harvesting cannabis plants.
Step 1: Progressive Harvest
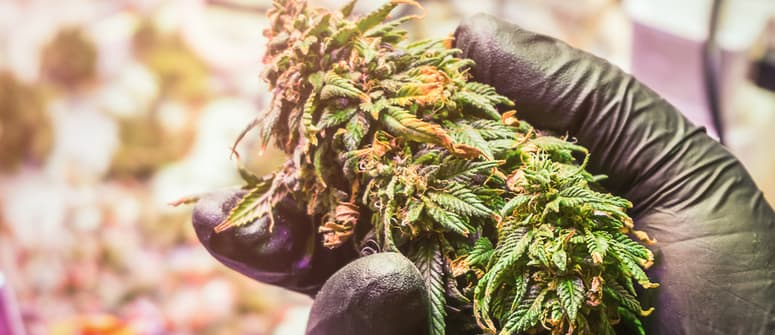
In a perfect world, every bud on your cannabis plant would be equally ripe come harvest time. But realistically, the buds at the top are likely to mature faster. For this reason, we recommend a progressive harvest—that is, harvesting branch by branch when buds are ready, as opposed to cutting the main stem and harvesting all at once.
In this way, you can harvest your buds over a period of days or weeks once they’re at their prime. Not only does this ensure you don’t lose out on potency or flavour, but it spreads out the harvesting work so you aren’t dedicating an entire day to the event.
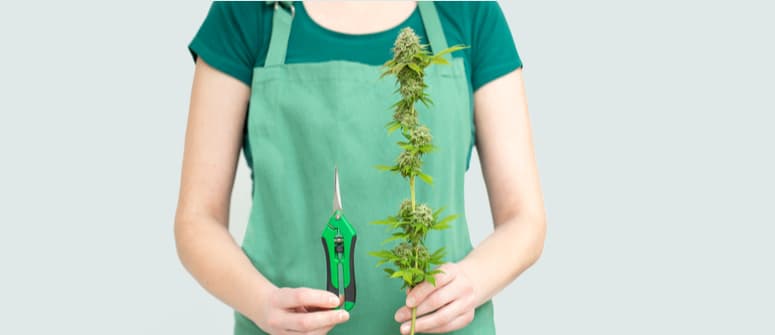
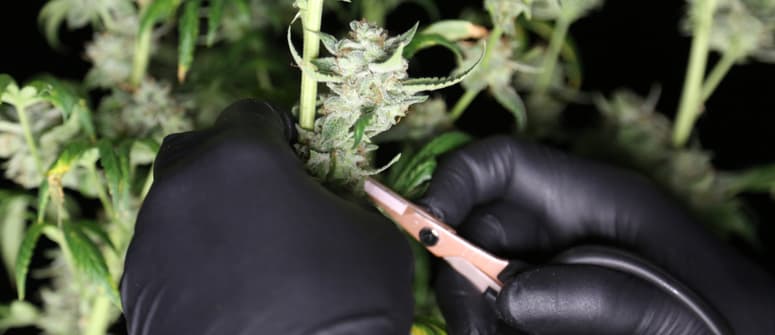
Step 2: Trimming
Trimming is an essential step in the harvesting process, serving multiple purposes—the most obvious of which is aesthetics. But properly trimmed buds also provide a smoother smoke, enhanced aroma, and concentrated potency.
You can choose to perform either wet or dry trimming. Each has its advantages, with the former working better for those living in humid climates, and the latter suiting those in arid climates.
The trimming process itself is simple but time-consuming. You start by removing the bigger, outer fan leaves. After that, you’ll shift your attention to trimming away the inner “sugar leaves”. This is where you manicure the buds and snip away excess plant matter to really hone in on the buds themselves.
Be sure to have your collection tray ready to stash those fan leaves and sugar leaves. You can make some great hash or edibles using this material!
Step 3: Drying
Depending on the method you choose, drying will come either before or after trimming. But for the purposes of this article, we’ll be placing it after the wet trimming process.
Drying cannabis crops can be done in a couple of different ways. The first simply involves hanging branches upside down from a clothesline or dowel like you would your wet clothes. You’ll just want to be sure that your buds are free of excess leaves to ensure proper airflow and avoid mould development.
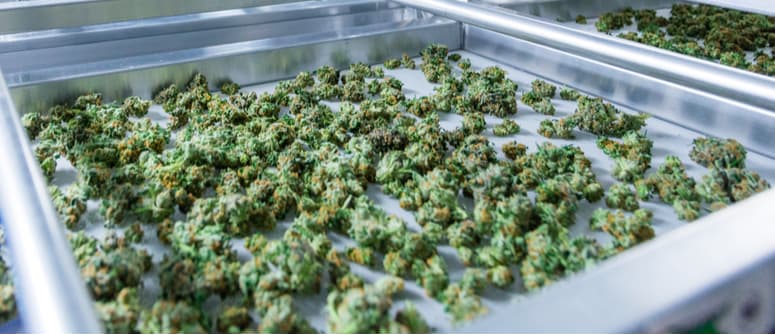
The other method is screen drying, which involves placing the buds on top of wire screens to boost airflow all around. Screen drying works best in a smaller drying room. Simply take multiple screens and stack them on top of each other.
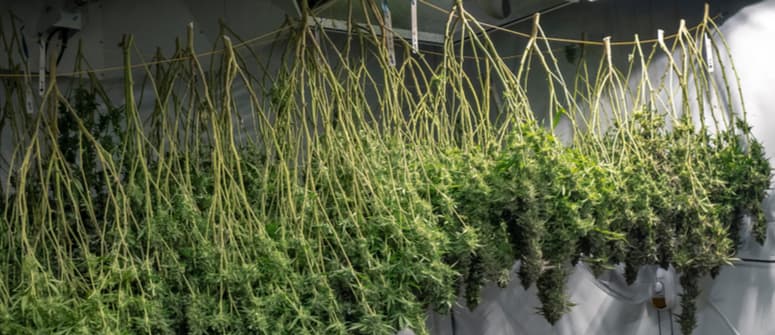
Regardless of which drying method you use, there are some key factors to consider regarding temperature, humidity, and airflow.
For one, you’ll want to maintain a consistent temperature of 18–23°C (64–73°F) to achieve even drying. In terms of humidity, aim for levels of about 50%. Lower humidity levels will lead to a hastened drying process and crumbly flowers, and higher humidity can lead to mould growth and rotting.
If possible, keep a standing fan running gently on oscillate, just to move the air around a bit. Also, turn the lights off in your drying room when you’re not tending to your buds, as light can also degrade the quality over time.
Hang-drying will usually take two to three weeks to complete, while rack drying should take around a week and a half. To determine if your buds are well-dried, bend the stems; if they snap easily, they're ready. If there's still resistance, wait a while longer.
Step 4: Curing
Curing signifies the beginning of the end of the harvesting process. In a nutshell, curing is the process of ageing your buds, just like how a vintner would with fine wine.
The curing process involves three main steps. First, you’ll place all of your dried buds into a Kilner or Mason jar. Glass jars are recommended to allow just enough aerobic bacteria to feed on the chlorophyll and expire without multiplying.
The next step is to store the jars in a cool, dark location. You’ll also want to aim for a relative humidity of 58–62% inside your jars, which you can easily maintain with humidity packs (like the ones cigar aficionados use).
Then, each day, unseal the jars to allow some air to flow for around ten minutes. Give the buds a little stir and check them for any foul odours or possible mould development. Repeat this daily “burping” process for a period of at least four weeks. Some people choose to cure their buds for much longer than this, albeit with diminishing returns over an extended period.
Step 5: Storing
Storing plays an important role in the final quality of your product. Doing so properly will give you flavourful and potent buds devoid of mould.
You can continue to use your airtight glass curing jars for storage. Here too, you’ll want to keep your jars in a cool, dark location to avoid any loss of flavour or potency. Avoid ever using plastic baggies for long-term storage. Even ziplock bags are porous and allow air and moisture to come in and out. Storage is not the place to be cheap, and quality glass jars are relatively inexpensive.
How Often Can You Harvest Cannabis?
The advantage of frequent harvesting is that you’ll never be without weed! But how often you can do it will depend on whether you’re growing indoors or outdoors, and whether you’re using photoperiod or autoflowering strains.
Indoor growing takes an average of 3–8 months, from seed to harvest. That allows for up to four harvests per year from autoflowers or speedy photoperiods, and up to two harvests from average photoperiod strains.
Outdoors, you can put in an estimate of one harvest per year for most photoperiod strains. Those in warmer, more cannabis-friendly climates may be able to squeeze in two. With autoflowers, there’s technically no limit on how many harvests you can achieve outdoors, although these plants shouldn’t be exposed to frost or otherwise lousy conditions, as quality and yields will suffer.
Harvesting Cannabis for Beginners: You Can Do It!
There are a lot of variables to keep in mind when it comes to harvesting cannabis.
However, the process itself is very straightforward. Even if you’re a beginner, you can achieve desirable results by following the steps introduced above. These will work just fine whether you grow indoors or outdoors.
Go ahead and give it a shot! If you do it right, you’ll be rewarded with a fine product you can enjoy and share.
