


With so many types of lights, an array of different setups, and a whole load of information, knowing where to start with your first cannabis grow can be hard. So, kindly, we've put together a comprehensive and simple guide on how to set up your first grow space, and everything you'll need to make it a success.
Contents:
Growing cannabis is not the easiest task in the world, but it can be one of the most rewarding. Getting your grow room set up and optimised is essential to a successful crop. By cutting corners and assuming a “that will do” attitude, you’re setting yourself up for failure.
Get things right before you start growing, and you’ll save yourself so much effort and wasted time in the long run. Wondering where to start? Well, here! We’ve got all the info you need to get your grow room up and running, and eventually achieve the best crop possible.
What You Need To Set Up the Perfect Cannabis Grow Room
When starting off with your first grow, things are going to be a lot easier if you have everything to hand from day one. It’s no good seeing the first shoots popping up and realising you’ve forgotten something. So, we’ve put together a list of all the essential equipment you’ll need to get your grow off the ground without a hitch.
• Seed starter plugs: These are the perfect containers to germinate your cannabis seeds in. Made of peat, they have the necessary air to water ratio to give your seeds the best start. Once they germinate, you’ll transfer them to bigger pots.
• Fabric pots: You may not have come across fabric pots before, but they’re a great addition. As the walls are porous, they allow the soil to breathe and make root rot less likely. In addition, they use the principle of air pruning, so you never have to worry about roots growing out of the pot and repotting becomes a cakewalk.
• Grow tent: Don’t be tempted to go without one of these. If you want to set up a proper grow with good results, a tent will have you covered. Unless you have a big room that you can afford to convert, a tent is by far the best way to go.
• Grow lights: We would recommend going with full-spectrum LEDs. They don’t require changing as the plant’s phase changes, they use about 50% less energy compared to other lights (less cost, less heat), and they have the perfect spectrum of light, meaning you get the very best yields.
• Timers: Though not strictly essential, they will make your life much easier. You plug your grow lights into the timers, and then plug those into the wall. That way, the light-dark cycle is fully automated. This gives you much more freedom.
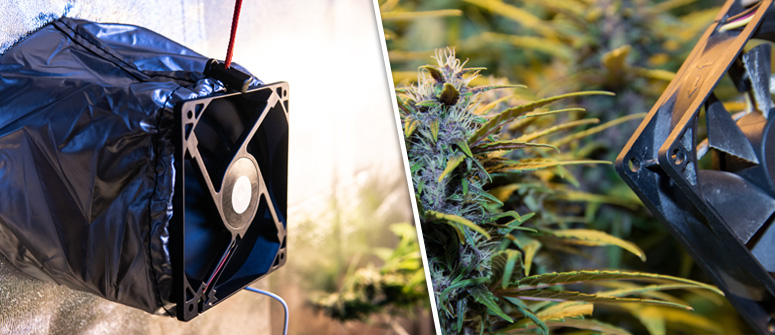
• Oscillating/rotating fan: Good air circulation is essential. If air gets stagnant, then you’re going to have mould and rot problems. A cheap fan that can be mounted on the tent wall will keep your cannabis plants healthy.
• Inline fan and ducting: By constantly drawing fresh air in, and stale, hot air out, this will keep your plants happy. Coupled with the rotating fan, this maximises freshness and maintains a healthy humidity.
• Carbon filter: This is placed in your ducting. As the air (from inside the tent) is drawn through, the cannabis odour will be absorbed. This means that your tent won’t be pumping out litres of cannabis-flavoured air!
• Thermo-hygrometer: These measure humidity and temperature. Controlling these variables is essential to a happy, healthy crop.
• pH reader: Keeping an ideal acidity level in your soil (about 6.0–6.5) will ensure optimal health for your marijuana plants. Without a pH reader, you’ll be completely in the dark about the state of your soil.
• Pruning shears: Throughout your grow, you’ll need to prune your plants to keep them under control. Moreover, when harvest time comes, you’ll have a lot of buds to snip. Invest in a good, robust pair with sharp blades, as they’ll have a lot of work to do. And make sure you keep them clean!
• Watering can: This one’s fairly obvious. Your plants need to drink. Get a size that allows you to water a good amount at once, but not so big that it becomes cumbersome in a small place full of electrics.
• Spray bottles: These are used to mist your plants’ leaves. Plants like to absorb moisture through their leaves too, and cannabis likes a slightly humid environment (about 55–70%) in the vegetative stage. Spray bottles will help you meet these needs.
• String: This is a useful bit of kit that will keep coming in handy. Whether you need to secure plants, train them, support them, or attach equipment to the tent, a string will always be useful!
• Duct tape: Perfect for securing and sealing, you’ll be grateful you’ve got it.
• Latex-free gloves: You’ll want gloves. Not only do they keep your crop cleaner, but repeated exposure to cannabis resin will irritate your skin. Not only that, but trying to do fiddly work with hands coated in sticky cannabis juice will become tiresome.
• Protective glasses: While sunglasses may suffice, a proper pair of indoor growing glasses will be much better. Normal sunglasses fail to block out the full spectrum of light emitted by grow lights. A proper pair will make prolonged exposure much more comfortable, not to mention safe.
• Bud-trimming machine: This is not actually essential, but if you get a good crop (and with this guide, you will!), it will make your life much easier.
• Airtight jars: These will give your cured buds a much longer shelf life. And they look good!
• Extension lead: This will give you much-needed flexibility with power. However, make sure you don’t overload them. No crop is worth a house fire.

How To Set Up an Indoor Marijuana Grow Room: Step by Step
So, now that you’ve got all your equipment, you need to know how to use it. Though we’ve advised using a tent and LEDs, we’ll go through the other possibilities too. As with all good things in life, setting up a cannabis grow room is worth doing well. The better your initial setup, the easier your life will be. Trying to fix something when the plants are fully grown is going to be a lot more difficult than getting it right at the beginning!
Step 1: Find a Suitable Space for Your Marijuana Grow Room
First, you need to decide where you’ll grow your crop.
Size
Consider the size of your chosen space. Is it a huge grow room, a cupboard, or will you use a grow tent? The materials you need, and the energy required to maintain the right environment, will all depend on the size of your space. Pick one that best matches your desired results.
Power
You’ll need access to a power supply. The closer the better. You don’t want leads trailing through your whole house.
Water
Likewise, you want to be close to a water source. This may not be as accessible as power, but minimise distance as much as possible. The less tubing full of water you have lying around, the less likely accidents are to occur.
Noise
All the equipment will make some noise. While not too loud, it can be annoying for you or your neighbours. If possible, set up your grow room where the noise will be unobtrusive.
Flooring
Don’t grow directly on a carpet. These hold water, and thus bacteria and fungi. Either choose a hard surface or lay down plastic sheeting.
Step 2: Make Your Marijuana Grow Room Light-Tight
You don’t want light leaking in or out of your grow room. If it leaks out, you’re losing precious wattage. If it leaks in, you could disrupt your plants’ light-dark cycle, which could wreck your whole crop.
Tents come sealed and covered in appropriate reflective material. If you’re using a room, either paint it white or line it with something designed to hold light (panda film, etc.). More reflection means less power on your end.
Step 3: Configure Your Marijuana Grow Room
So, you need to decide what to do with your space. Use the whole room? Put a tent in it? Convert a cupboard or other small space? Each of these comes with its own benefits and drawbacks. Large grow rooms mean bigger crops and ease of access, but require a greater investment and are harder to manage. Small spaces are cheap and efficient, but can be cramped and will limit your overall crop.
This is why we advise a tent as a happy middle-ground. Ultimately, though, it will come down to what you have available, and what you hope to get out of it.
Whole Grow Room Setup
If you’ve got a lot of free space, a nice budget, and a desire for huge crops, maybe you’ll convert a whole room into a grow. Though this will be a lot of work, the results can be outstanding.
As a rule of thumb, you’ll want one grow light (lamp + ballast + reflector) for every 1.2m². If you have a massive room, consider filling it with multiple tents. This can make it more efficient, and allow you to run multiple grows at different stages simultaneously.
Room in a Room (Grow Tent)
Which leads us to grow tents. This is probably the easiest way for a beginner to grow cannabis. As they are perfectly designed to be light-tight, insulated, and to have equipment fixed to them, they’ll make your life much easier.
There are many affordable, ready-made options around. But, if you’re on a tight budget, or just love DIY, it is very possible to build your own grow tent.
Converted Space (Cupboard)
Unless this is all you have available to you, we’d recommend not going this small. Heat buildup in small spaces can be a problem, as can accessing a mature crop.
If you do use this method, opt for cool, low-power lights (such as LEDs or CFLs) and make sure you have a good ventilation system bringing fresh air in and pulling old air out. Otherwise, you will encounter problems.
Step 4: Setting Up the Lighting System for Your Marijuana Grow Room
 Everyone knows that cannabis cultivation needs a very specific lighting setup, and it can be daunting. Without the right spectrum at the right time, your grow will seriously suffer.
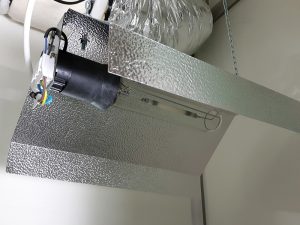
A lighting setup consists of a lamp (to produce the light), a ballast (to supply the correct power), and a reflector (to direct all the light toward your plants).
For a smaller grow, one main grow light will suffice. Though, depending on your budget, you may want to add some supplementary lighting too.
Setting Up Reflective Walls in Your Grow Room
Your grow space needs reflective walls, else a lot of light will be wasted. If you decide to use a grow tent, this is taken care of. If you’re converting a space, you will need to do this yourself.
The three best materials to line your walls are:
• Diamond Mylar: 90–95% reflectivity. It holds both heat and light.
• Black and white foil: 85–95% reflectivity. The white internal side reflects light and the black external side blocks light. Cheaper than Mylar, the main drawback is that it can melt under heat.
• Flat white latex paint: 80–90% reflectivity. This is the cheapest option, and great for big spaces. One thing to note, matte paint actually reflects more than gloss.
Whichever setup you opt for, make sure it’s smooth. Lumps and bumps will reduce reflectivity a lot.
Different Light Options for Your Grow Room
There are a large number of different options for your lighting setup, and this can be intimidating. Below, we’ll go through all the different types so you can gauge which one is best suited to your grow.
HID Grow Lights
HID lights are the most popular form of grow light. They are powerful and efficient. Available as high-pressure sodium (HPS), metal halide (MH), and ceramic metal halide (CMH—it combines elements of both MH and HPS), they are a very reliable option.
However, HID lights produce a lot of heat. This makes them potentially difficult to handle. First, too much heat will hurt your crop. Second, escaped heat can make a grow obvious. And third, it could potentially cause a fire.
That being said, if you’re growing during winter or in a cooler climate, this radiant heat can actually be a good thing. In summer, it will be a hindrance.
So, if you opt for HID, ensure you have good ventilation and an accurate temperature-monitoring system.
LED Grow Lights
LEDs are a relatively recent addition to the cannabis grow light market. They produce much less radiant heat than HID lights, making it easier to keep your grow at a cooler, controlled temperature.
Though more expensive to buy, they are cheaper to run and last much, much longer. In time, they will pay for themselves.
Another thing about LEDs; cheaper options won’t emit a full spectrum of light, and your plants will suffer because of this. So, if you go for LED, spend enough to get a full-spectrum. The upside of this is that you can use the same setup for your whole grow, as you’ll have both the vegetative and flowering phases covered.
Fluorescent Grow Lights
Fluorescent lights are cheap and cool. They can be great for the novice grower. However, they will need to be swapped between the vegetative and flowering stage, as they emit a limited spectrum of light. What’s more, as their wattage output is lower than other options, they will produce smaller yields. They will also need replacing more regularly than other options.
That being said, for the first-time grower who’s just starting out, they may be the perfect option. The low-cost element should not be overlooked. Also, with a proper setup, light efficiency can be maximised and the differences will be hard to notice.
Step 5: Setting Up an Air Exchange System in Your Marijuana Grow Room
Plants need a fresh supply of cool air in order to stay healthy. If you have them sat in hot, humid air that never changes, you’ll find you quickly get pests and illness infiltrating your grow. Moreover, to avoid a dangerous buildup of heat, adequate ventilation is essential.
How To Set Up Ventilation in Your Grow Room
We all know that plants breathe carbon dioxide, but they need oxygen too. Those parts that don’t photosynthesise (roots, for example) require oxygen. And too much carbon dioxide can be a bad thing too, so bringing in fresh air keeps the levels suitable.
Grow tents come with ducting inputs and outputs; you will usually run your ducting for the output to make an exhaust. If you’re making your own space, you’ll need to do this yourself. You’ll place your inline fan in the centre of your ducting, and it will draw fresh air in as it pushes stale air out.
How To Set Up a Carbon Filter System in Your Grow Room
The placing of your carbon filter will depend on your setup. In general, it is positioned close to the ceiling, but if you run a really small grow, you might want to place it outside your tent. Either way will help greatly in control odour, making your grow more discreet and stopping your house from stinking of weed all the time.
How To Ensure the Best Environment in a Grow Room
Like all things, cannabis plants have optimal environments. Though they tend to be robust, and can produce crops under difficult conditions, for the best results the environment must be optimised. Below are the ideal temperature and humidity metrics for your indoor grow room setup.
What Is the Ideal Temperature in a Grow Room?
Your specific grow room setup will determine to what degree (pardon the pun) you can fine-tune the temperature. If it sits between 20 and 30°C, you’ll be good.
However, around 25°C during the day and 17–20°C at night will get the very best from your plants.
What Is the Best Humidity Level in a Grow Room?
Air that’s too dry will cause moisture loss from your plants. You can’t compensate for this by overwatering, as this will drown the roots. Therefore, you need to maintain the right humidity. Your specific strain will dictate what level of humidity it can handle. Indicas tend to handle drier conditions, and sativas more humidity. Autoflowering plants bred with ruderalis genetics are generally more robust and will tolerate lower humidity.
For the different stages, the optimal ranges are as follows:
• Seedling: 65–80%
• Vegetative stage: 55–70%
• Flowering stage: 40–50%
Grow Room Safety
Keeping your grow room clean is really important. Primarily, this will stop the buildup of pests and fungi. Any of these can be devastating to your grow and ruin months of work. Regular cleaning can keep on top of this.
But, there’s a safety element to it too. There’s a lot of water and electricity going around in an often small space. To avoid the risk of shocks or fire, tidying and cleaning is paramount. Removing trip hazards, flammable things, and spillages will be well worth it in the long run.
Plus, when your plants are huge and bushy, you’ll be cramped anyway. Removing excess clutter will make life much easier. You don’t want to get to the flowering stage only to trip over a cable and crush your plants!
Essential Tips for Growing Weed Indoors
That’s almost it. To finish off, we’ll leave you with some top tips to get the most out of your indoor grow!
• Choose the right grow light: Don’t skimp on your lighting setup. Do some research and buy grow lights that will offer your plants all they need, even if they cost a little more.
• Force extra bud sites: With a little training and stressing, you can make your plant produce many more bud sites, making it yield more bud!
• Remove hermaphrodites and males: Males shouldn’t be a problem if you buy feminized seeds. Sometimes, female plants will exhibit hermaphroditic traits when sufficiently stressed. It’s ingenious, but annoying if you want a high-quality crop. Where the branch meets the stem is where you will verify the sex of your plants. Females grow pistils, and males pollen sacs. Hermaphroditic plants will produce what are commonly known as “bananas”, which they use to pollinate themselves. Remove anything with a pollen sac as soon as it appears. If they pollinate the females, the viability of the crop will reduce dramatically.
• Learn about nutrition: Plants need different nutrients at different stages. Learning about this will maximise your crop.
• Spot illness and pests: Discoloured leaves, black spots, and wilting all point to problems. Learn what the different signs mean and how best to deal with them.
• Don’t shout about it: Cannabis is still a controversial topic, and you don’t want unwanted attention. No matter how proud you are of your grow, keep it close to your chest. You’ll be thankful for it.
• Love your plants! By approaching your grow with love and care every day, and giving it the time and patience it needs, you’ll be sure to get things right. Take your time, do your research, and don’t cut corners, and you’ll find yourself well rewarded!
