


 from cannabis plants")
Making genetic duplicates of your favorite cannabis plants is an easy thing to do - you just have to be properly prepared and work through the process.
You may think of “cloning” as something to do with say, Dolly the Sheep. It actually means asexual reproduction. As Frankenstonian as it sounds, cloning is a relatively simple scientific concept. All it really means is using a piece of what you have now to grow something else. In the case of plant cloning in general and canna-planting specifically, it is actually very easy. That said, it works best as a planned process.
With this technique, you can make other plants that are genetically identical to their “mother” plant. That means if you are breeding a specific new breed or your particular strain when you have it, you can duplicate it.
WHY CLONE AT ALL?
There are several answers to this question.
The first is that you do not have access to any seeds. The second is that you don’t want to grow from seeds. Then, of course, it is just plain old faster than growing new plants from seed every time.
Then, there is also the matter of breeding. Every cannabis seed is like a human being – no two are alike. If you like a particular taste, potency or yield of a certain plant, you can duplicate it. Every “cutting” if properly handled, will grow roots of its own.
WHAT YOU WILL NEED
- A sharp razor. Do not use scissors – they can crush branches and damage root formation
- A healthy (female) cannabis plant about two months into the vegetative cycle
- A rooting medium (e.g. rock wool, oasis cubes, coconut fibre)
- A rooting hormone
- A vase or tall glass with water (for the cuttings)
- Leaf trimmer or clipper
- A mild grow light (if growing indoors)
- High proof alcohol (for disinfecting your tools)
HOW TO GET STARTED
Successful cloning requires a few steps. The first is actually preparing the mother plant for cloning in the first place.
First, do not fertilize the mother plant several days before planning on taking the cuttings. This is to allow the nitrogen to work its way out of the plant. Too much nitrogen in the cuttings will encourage the wrong activity. The clones will divert energy into growing vegetation rather than rooting.
Second, work in a sterile environment. Do everything you can to avoid over agitation of the mother plant and new cuttings. For example, try not to move the plant. Keep the environment as free as pests, growths and bugs as possible. Wash your hands before attending to the plant. Choose well-suited soil in the first place. Sanitize all your tools with alcohol.
Thirdly, inspect the mother plants for lower branches that are healthy and sturdy. If you plan to root in rock wool, match the stem with the rooting hole of your cubes to get the right fit. In other cases, try to take cuttings between 8-10 inches long with several nodes.
Fourth, be careful about cutting form. When cutting the branch, cut as close to the main stem as possible. Using the razor, try to aim for a 45-degree angle from the branch. This is to increase the surface area of the rooting space. This will promote faster growth.
Finally, make sure to immediately place the fresh cutting into water. This prevents air bubbles from forming in the stem. Bubbles prevent water absorption into the stem and can kill a new clone. Some growers actually make additional incisions in the stem during this step to encourage rooting. Do this before you transfer your cuttings to water.
PREPARING THE CUTTINGS
Now that you have taken several cuttings and transferred them to water, you have to prepare them again. To support proper photosynthesis and a more sanitary grow environment, you will need to clip them.
Clip fan leaves about halfway down the stem (using scissors or a clipper). You can also cull any unnecessary leaves further down. This will ensure that the leaves do not touch the growing medium. This manicuring process will help your clones with nutrient and water uptake. It will also prevent the growing leaves from touching or crowding each other.
Many growers utilize rooting hormone at this point. The hormone is commonly sold in the form of gels and powders. There is a wide variety on the market. Experiment with the one you find easiest to use.
After dipping your cuttings briefly in the hormone, transfer your clones to the final rooting medium.
ROOTING
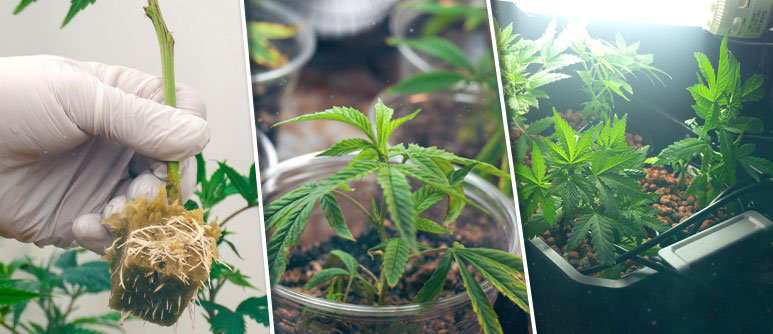
There are three techniques to root your plants. Each technique has pros and cons. Experiment to see which method works best for you. No matter which method you select, make sure that your clones get plenty of humidity and the right light. You will also need to pre-soak your growing medium before you start. Rock wool must be soaked for 24 hours before use. It is also important to use distilled water if possible, with an adjusted pH of 4.5 to 5.
Rock wool cubes. Rockwell provides a base for clone rooting because of its airflow and moisture retention. They are easily found in grow stores. Just carefully place your clone into the moistened starter cube.
Soil. When choosing soil, go for one without an abundance of nutrients. You also have to be very careful to not over (or under) water your soil during rooting. This is by far the most complicated of the rooting techniques and easiest to get wrong.
Water. This is a super easy method. Water cloning also does not require the use of hormones. Just drop your cutting in water. Keep there until roots begin to grow.
The plantings won’t need light for the first couple of days. After that time, make sure your clones have about 18 hours of light (and 6 hours of dark) to grow properly. Make sure to keep your clones in a warm, humid environment.
ADDITIONAL TIPS FOR SUCCESSFUL CLONING
New clones do not have roots. That means they need moist, warm conditions to thrive. Try to mist your plantings with water to keep leaves moist the first week. You also have to be aware of mould growth. If the clones are under a humidity dome, it is important to lift the dome several times a day to prevent mould growth.
It is also important never to contaminate your rooting gel or powder. Any dust or contaminant in the jar can spoil the whole batch. Do not dip your roots in other words into the gel or powder. Rather apply it in an external tray.
The best time to take cuttings is actually right before your mother plant begins flowering.
Also, do not hesitate to take more clones than you think you will need. Not all clones are successful.
Be patient. Most clones begin rooting in several days, but a few can take up to a few weeks.
Remember that you can always maintain the desired mother plants for your clones for a long time. If you prevent the plants from flowering, they can last several years. To accomplish this, keep your cloning mothers under a vegging light (or 18/6 light schedule).
TRANSPLANTING YOUR ROOTS
When new vegetative growth appears, you will now want to transplant them to a stable growing area. When transplanting, use the same care and hygiene as you did when originally preparing the stalks. Transplant shock is very common.
