


Fully understanding the needs of the cannabis plant can take years of practice. But we've tried to convey, as best we can, all we've learned about the flowering stage in one comprehensive post. For those just starting out, find out all you need to know about the transition to the flowering stage, and what to do once you get there.
Contents:
There’s a lot to know about growing cannabis, and some of it can seem unnecessary, jargon-rich, and overly complex. This is not the case with the flowering stage. This is the longest, and arguably most important, part of the cannabis plant’s life cycle, and the one that is most exciting.
During this stage, the buds will begin to appear, the smell will become apparent, and your plant will begin to sag under the weight of its own generosity.
In order to get the most out of your cannabis plant, you need to meet its every need during the flowering stage, which involves recognising how far along it is in maturity. Fear not, though, as we’ve put together a comprehensive week-by-week guide on each stage of the flowering phase, and what to do for your plant when it enters this all-important part of its life.
We’ve even got a little info on the pre-flowering stage, so you can time your harvest right and get the very most out of your precious buds!
What Is the Flowering Stage in Cannabis Plants?
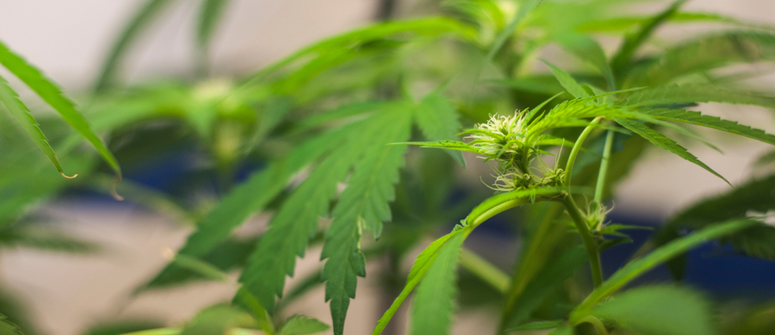
In cannabis plants, the flowering stage is the period during which the plant produces its flowers, or buds. These are what we’re all after when we grow cannabis, and seeing them develop is exciting and anxiety-provoking in equal measure!
The flowering stage directly follows the vegetative stage. During the vegetative stage, the cannabis plant grows quickly and rapidly, developing much of its overall height in the first several weeks of its life. A lot happens at this point. From the first little leaves pushing their way above the soil to a gangly, thin cannabis plant, the vegetative stage is rapid and productive.
After one final, huge burst of energy, vegetative growth slows and eventually ceases once the plant enters the flowering stage, as all energy is directed toward the production of rich, sticky buds.
When Is the Flowering Stage of Cannabis Plants?
For photoperiod cannabis plants (non-autoflowering strains), a cannabis plant’s flowering stage begins when the hours of light exposure decrease. Outdoors, the transition to flowering occurs naturally as the days shorten with autumn's arrival. Indoors, this is imitated by a switch from an 18/6 light cycle to a 12/12 light cycle.
However, don’t make the mistake of thinking the plant immediately enters the flowering stage. Most plants will take between 1 and 3 weeks before they fully begin flowering. The light change is just to trigger this process. Before it can happen, the plant has to go through a number of hormonal and physiological changes, as it is entering the part of its life where it is ready to reproduce. Basically, your plant is going through puberty.
The pre-flowering stage, between the vegetative and flowering stages, is when the plant switches from foliage production to bud production. How do you tell when it has truly entered the flowering stage? Begin counting from the day the little white pistils begin appearing on your plant. In doing this, you’ll ensure you don’t harvest prematurely.
How Long Is the Cannabis Flowering Stage?
How long is a piece of string? The flowering phase of a cannabis plant can vary massively between strains, and even a little between individual plants. Indica strains tend to be the fastest, coming in at between 6 and 10 weeks. Sativa strains take a little longer, with some of the purest taking up to 16 weeks!
Breeders will give you fairly accurate estimates of how long your plant is likely to take to complete the flowering stage. Use this, combined with more general knowledge (given below), to assess exactly when your own plants have reached the point at which they should be harvested.
How To Force Cannabis Plants Into Flowering
For those growing outdoors in cooler climates, it may be preferable to force a crop into early flowering. This is done when the natural transition to flowering comes too late, which poses the threat of poor weather conditions spoiling your harvest.
In order to have two or even three crops throughout the spring and summer period, plants can be deprived of light to trigger an early flowering stage. This is done by creating a highly breathable cover that blocks out all light. A potentially easier method is to have the crop on a portable system and move it into a shed or something similar to imitate a 12/12 light cycle.
The Cannabis Flowering Stage: Week by Week
Each week in the cannabis flowering stage is different, and each comes with its own challenges and trepidations. But, fear not, we’re here to guide you through.
One note on our guide: it is only a guide. The weeks given below are approximate, and should by no means be taken as a definitive timescale. Each crop will be slightly different. What’s important is that all grows will go through the below stages in the same order; it’s just the timing may vary from strain to strain.
Week 1
This is sometimes known as the "transition" or "flowering stretch" stage. It is during this stage that your plant is on the brink of truly beginning flowering. As the diminishing light hours cause your plants to think that winter is on the horizon, they’ll prepare to offer you a potentially huge amount of bud by enacting one last surge of vegetative growth. Your cannabis plants can double, or even triple, in height in this one week (or so).
Large amounts of new leaves and stems are likely to grow, especially near the top cola. Although plants will need increased nutrients to support this, don’t get overzealous. Transition to flowering feed every other day, and don’t be tempted to overfeed. Overfeeding can cause nutrient burn, which is a sure way to set the progress of your plants back.
Depending on the strain, and the amount of space you have available, you may want to employ some gentle training or pruning to limit or control the growth. If plants get too bushy in a small space, for instance, they will compete for light, ultimately harming your crop.
Week 2
This is the week in which little white pistils will begin to develop on female plants. It is also the stage in which you will sex your plants (if you’re using regular seeds). At the intersection of where the branches meet the stem (often referred to as "bud sites"), female plants will display pistils (small, thin outgrowths), whereas male plants will have pollen sacs. As soon as you see any pollen sacs, you should immediately remove the male plants before they pollinate the females, unless you’re trying to breed new strains.
Now is the time to switch fully to a nutrient mix specific to the cannabis flowering stages. Follow the instructions on your specific feed, but usually this involves changing to a 1:2:2 NPK ratio (or similar).
Week 3
During this stage, your cannabis plants will more or less cease to grow. They are likely to be almost double the size they were only 3 weeks before, with most of the growth happening during week 1.
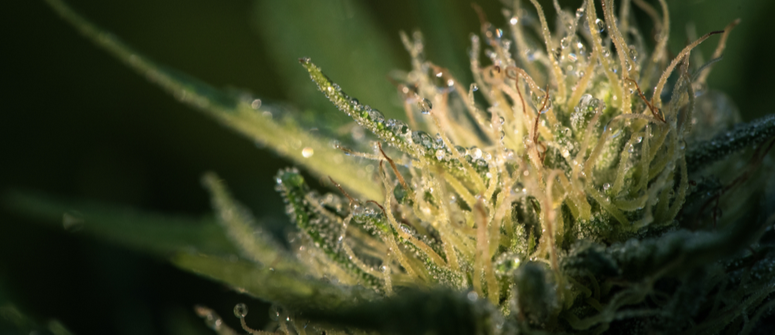
You'll start to see the bud sites where the white pistils first formed filling out with true flowers now. However, trichomes and resin glands will still be under-developed, so they won’t yet have that weedy stench or sticky appearance.
As the buds are now developing, it is essential that you are getting the feed right. Check for signs of underfeeding, such as yellowing leaves or leaves dropping off. Likewise, watch out for overfeeding too. This is often evident by discolouration on the peripheries of the leaves. In the case that you have overfed a plant, consider flushing the soil and starting again.
Week 4
The buds really begin to swell at this stage. All vegetative growth will have ceased entirely, and your plant will be focusing all of its energy on growing big, fat buds. The pistils will remain, but the buds will engorge. At this point, trichomes will begin to develop and the scents of your chosen plant will become apparent. Buds will also start to take on that sticky, frosted look.
Training your plant is no longer necessary, as it is no longer growing. Instead of tying it down, consider supporting the branches from now on. As the buds develop, the branches will be under more and more stress. Be sure to give them a helping hand if they begin to sag!
Week 5
You’re into the depths of the cannabis flowering stage at this point, and the smell will confirm it! Depending on your setup, this is when a good ventilation system could really come in handy. As your buds start to gain mass, mould and mildew will become more of a concern, so make sure you’re keeping humidity low (around 40%) if you’re growing indoors. If you have some super-bushy plants on your hands, make sure to defoliate to promote air exchange and equal light exposure.
New buds will begin developing at this point too. Not just at the bud sites where the branches meet the stem, but along the main cola too. Your plant will begin to look very fat at this point.
Another sign that things are moving along is that the pistils will begin to turn from white to orange or dark brown. Likewise, the trichomes will lose their transparency and begin to turn a milky-white colour.
Week 6
At this point, the very fastest of strains (and individual phenotypes) will be approaching their final week before harvest. Others will still be a few weeks off. During this stage, you’ll notice more of the same; buds will thicken, pistils will darken, and trichomes will become more obvious and opaque. And the smell will increase!
Week 7
For the average strain, now is about the right time to perform the final flush. By drenching the soil with pure, pH-balanced water, you'll wash out all the salts, minerals, and nutrients. Why do this? By essentially purifying your plant, the overall quality of the buds will be increased. Removing these elements makes for a smoother smoke that just tastes purer.
Growers tend to flush their crop 1 to 2 weeks before making the chop, so, once you do it, it’s important to continue watering your plant exclusively with pH-balanced water after this.
Week 8
Harvest time. What you’ve been patiently waiting for. Using a pocket microscope or jeweller's loupe, inspect the trichomes on your buds to ensure you’re not cutting too early.
When pretty much all of the trichomes have turned an opaque milky-white, then it is time to pick your buds! Trust your eyes here, rather than breeder instructions. If most of the trichomes are still transparent, then your plant is not fully matured. Trust your instincts.
Again, some plants take much longer to complete the flowering stage than others, so the exact duration of each stage mentioned above may be longer or shorter than just one week. But, in general, the above represents the progression you’ll see from week to week.
What Do Cannabis Plants Need During the Flowering Stage?
The requirements of your marijuana plants will change during the flowering phase, and it is essential that you fully meet their needs. In fact, with lighting, a photoperiod strain will only enter the flowering stage if it has the correct lighting setup.
Light Requirements of Cannabis Plants During the Flowering Stage
In order to induce and maintain the flowering stage, you’ll want to expose your cannabis plants to a constant 12/12 light cycle. This means they get 12 hours of light and 12 hours of darkness, day in and day out.
For maximum output, you’ll want to use a HID light that falls somewhere along the yellow or red colour band. Using this kind of light will ensure your plants get just the right amount of high-quality light to optimise their potential. However, full-spectrum LED setups rival these HID systems and offer comparable results.
If you’re growing outdoors, you obviously won’t have this much control. Hence, just make sure your cannabis plants are exposed to as much regular sunlight as possible. Also, make sure they are positioned so the light reaches all parts of the plant evenly.
Nutrient Requirements of Cannabis Plants During the Flowering Stage
Cannabis needs nitrogen, phosphorus, and potassium to grow efficiently. During the flowering stage, you’ll want to make sure your fertiliser is particularly rich in the latter two, as these are the key nutrients cannabis plants use in the production of buds.
Be careful with nitrogen fertilisers, especially after week 4 of flowering. Excess nitrogen can lower plants’ resistance, which attracts pests and diseases.
You might want to consider thoughtful use of cal-mag additives, which are known to improve general performance of plants, especially in the flowering stage. Again, don't overdo it, as you don't want to cause nutrient burn.
Remember to stop feeding around 1–3 weeks before harvest to let the plants reach the finish line without excess nutrients in their system.
Best Environment for the Cannabis Flowering Stage
If possible, you’re going to want to make a few changes in your grow room during the flowering stage. We’ve already covered lighting and nutrients, but there are some other considerations too.
Temperature
Though not essential, it is preferable to drop the day and night temperatures in your grow room by about 2–3ºC. By doing this, you further mimic the shift from summer to autumn that you are trying to represent with the change in light hours.
Simpler grows may not have the option of fine-tuning temperature to such a degree. If this is the case, don’t fret; it won’t make too much of a difference. If you can, though, all these little changes can have a good overall effect on your final crop.
Humidity
Once the buds begin to appear, you don’t want the humidity in the grow space to ever exceed 50%. If it does, it creates the perfect environment for bud rot. What’s more, with this much moisture in the air, you’re far more likely to get droplets forming on the ceiling, which could drip onto electrics and cause potentially catastrophic problems. You want to aim for 40% RH during this stage.
pH Level
If you’re growing in soil, then a pH somewhere between 6.0 and 6.5 is going to make the perfect environment for your plants. If you’re growing hydroponically, a more acidic environment is better, about 5.5–6.0.
One thing to note. If you have to flush your plant due to overfeeding, or just when you reach the flushing stage, be extra observant of the pH levels following that. Most water is slightly alkaline and will likely raise the pH level of your chosen medium. As such, you may well need to add some acid to balance this out somewhat. Investing in a decent pH pen is well worth it!
Ventilation and Circulation
Good circulation is always important. But, as the plants get bigger and bushier, it will be harder to ventilate the lower parts of the plant, including the roots. If you get a stagnant buildup of humidity here, it can be bad. Therefore, as the flowering stage progresses, ensure adequate circulation near the base of your plants.
Ventilation will also become increasingly important as the plant matures. As the trichomes develop, the plant will become smellier and smellier. Unless you’ve opted for a low-odour cannabis plant, you’re likely to want a good ventilation system fitted with something like a carbon filter to eradicate the smell.
Cannabis Flowering: Final Considerations
The most important part of growing cannabis is paying careful attention to your plants. While they may not actually speak, cannabis plants are very good at telling us what they need and how they’re developing. Hence, make sure to read up on grow literature and pay special attention to the unique genetics and phenotype you’re working with.
In doing so, you can rest assured that your marijuana plants will be the very best they can be, and you’ll be rewarded with a heavy harvest of delicious buds.
